
High Availibility Web Server using Nginx and Keepalived
Build a reliable web server setup with Nginx and Keepalived to achieve High Availability (HA) ensuring your website stays online even if one server fails.
What is High Availibility?
High Availability Web Server is the ability of a web server system to continue operating and providing uninterrupted services around the time, including when there is a failure or outage of one of its components. The main purpose of high availability (HA) is to reduce the risk of downtime when services are not available.
On this occasion, I will give a little example of implementing HA web server only on a virtual machine (VM) using a virtual box, now here is a little description of the needs for implementing the High Availibility web server
Requirements
| No | Number | Type of Needs | Tools | Description |
|---|---|---|---|---|
| 1 | 2 | Web Server | 1. Apache2 | Used to serve requests from clients and process all processing |
| 2 | 1 | Master LB | 1. Nginx 2. Keepalived | Used as the main load balancer which will later be used to distribute traffic |
| 3 | 1 | Backup LB | 1. Nginx 2. Keepalived | Used as a backup load balancer which will take over if the main load balancer fails. |
Topology
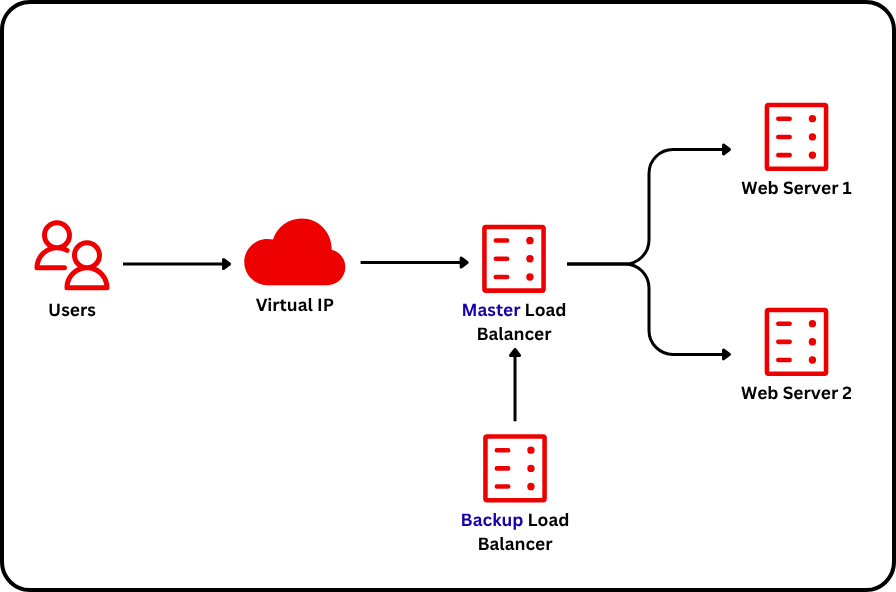
| Node Name | IP |
|---|---|
| Master Load Balancer | 192.168.100.10 |
| Backup Load Balancer | 192.168.100.11 |
| Web Server 1 | 192.168.100.12 |
| Web Server 2 | 192.168.100.13 |
| Virtual IP Load Balancer | 192.168.100.50 |
Installation
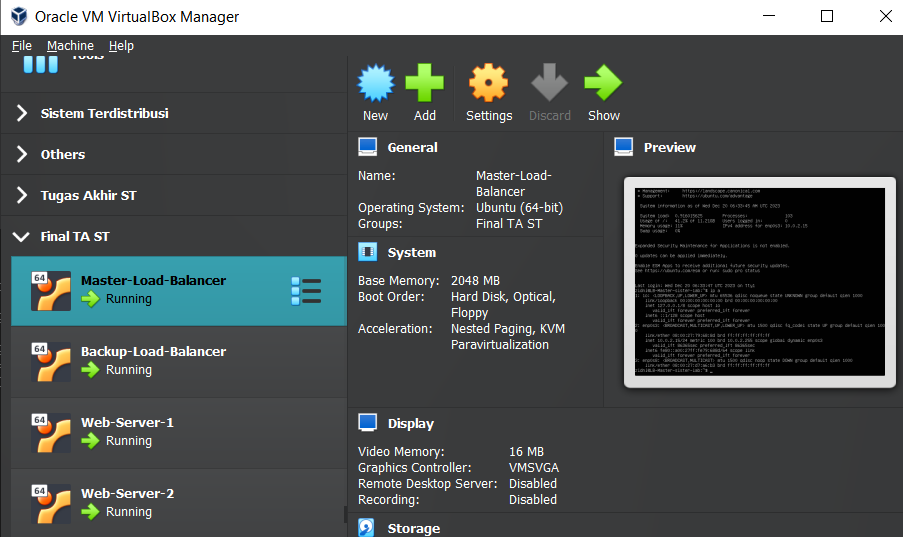
A. Virtual Box
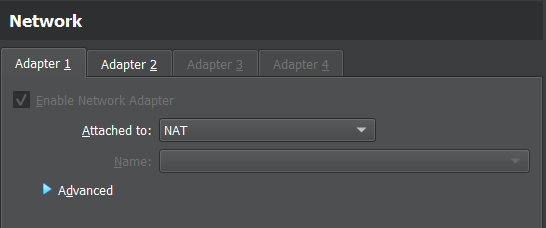
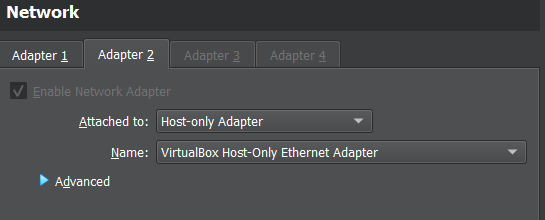
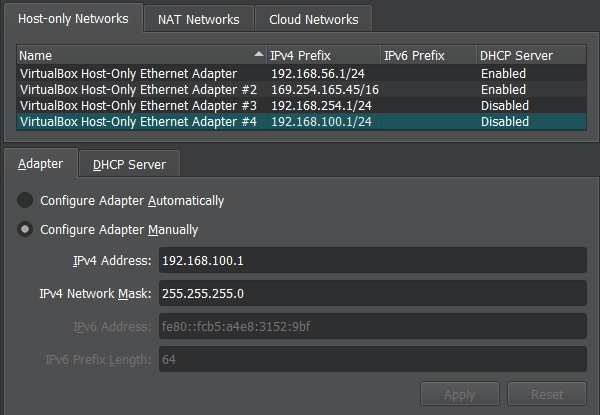
B. Network Setting
Has 2 adapters that are active NAT and Host-only Adapter
C. Assign IP
-
Assign IP using ifupdown using the command
sudo apt install ifupdown -y -
Then enter the IP configuration
sudo nano /etc/network/interfaces -
Then change the contents of the configuration file
auto lo iface lo inet loopback auto enp0s3 iface enp0s3 inet dhcp auto enp0s8 iface enp0s8 inet static address 192.168.100.10/24-
In the red section, replace it according to the IP that has been previously determined on all servers
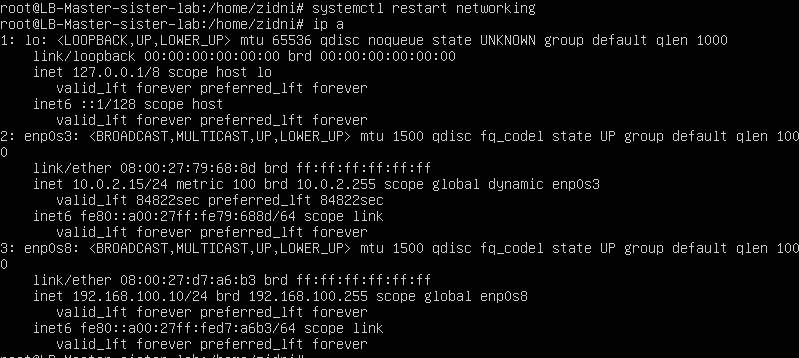
systemctl restart networking
-
-
Perform IP configuration on all nodes that have been installed
-
IP results using the ip a command on the Load Balancer Master node
D. Install Load Balancer
-
Install nginx using the command
sudo apt install nginx -y -
Then enter the configuration for the proxy load balancer and create a file called "sister.conf"
sudo nano /etc/nginx/conf.d/sister.conf -
Enter the following configuration
upstream sister-lb { server 192.168.100.12:80; server 192.168.100.13:80; } server { listen 80; server_name sister.com; access_log /var/log/nginx/access.log; error_log /var/log/nginx/error.log; location / { proxy_pass http://sister-lb; proxy_set_header Host $host; proxy_set_header X-Real-IP $remote_addr; } } -
Second configuration in the /etc/nginx/nginx.conf folder
sudo nano /etc/nginx/nginx/conf -
Then use the config and paste it in the file
user www-data; worker_processes auto; worker_rlimit_nofile 8192; pid /run/nginx.pid; events { worker_connections 4096; } http { include mime.types; default_type application/octet-stream; # Log Setting log_format complete '\$remote_addr - \$remote_user [\$time_local] "\$request" ' '\$status $body_bytes_sent "\$http_referer" ' '"\$http_user_agent" "\$http_x_forwarded_for" ' 'rt=\$request_time ' 'ua="\$upstream_addr" us="\$upstream_status" ' 'ut="\$upstream_response_time" ul="\$upstream_response_length"'; access_log /var/log/nginx/access.log complete; error_log /var/log/nginx/error.log warn; # Sending fille Optimization sendfile on; tcp_nopush on; tcp_nodelay on; # Keepalive Connection keepalive_timeout 65; upstream sister-lb { server 192.168.100.12:80; server 192.168.100.13:80; } server { listen 80; server_name sister.com; location / { # HTTP 1.1 proxy_http_version 1.1; proxy_set_header Connection ""; proxy_set_header Host $host; proxy_pass http://sister-lb; } } }- In the upstream section filled with IP web server 1 with ip 100.12 and Web server 2 with ip = 100**.13**
-
Then restart nginx
sudo systemctl restart nginx -
Then run the following command, to check the configuration
sudo nginx -t- If the configuration is successful, the results are as follows

-
Next we reload nginx so that the config runs
sudo nginx -s reload
E. Install Web Server
-
First install apache2 with the command
sudo apt install apache2 -y -
Then we will create a "sister" folder by way of
sudo mkdir –p /var/www/sister -
Create an index file for Web-Server-1 by way of
sudo nano /var/www/sister/index.html- Fill in the text "This is web server 1" as follows
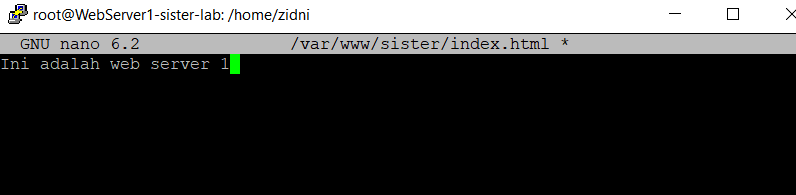
- Then save
-
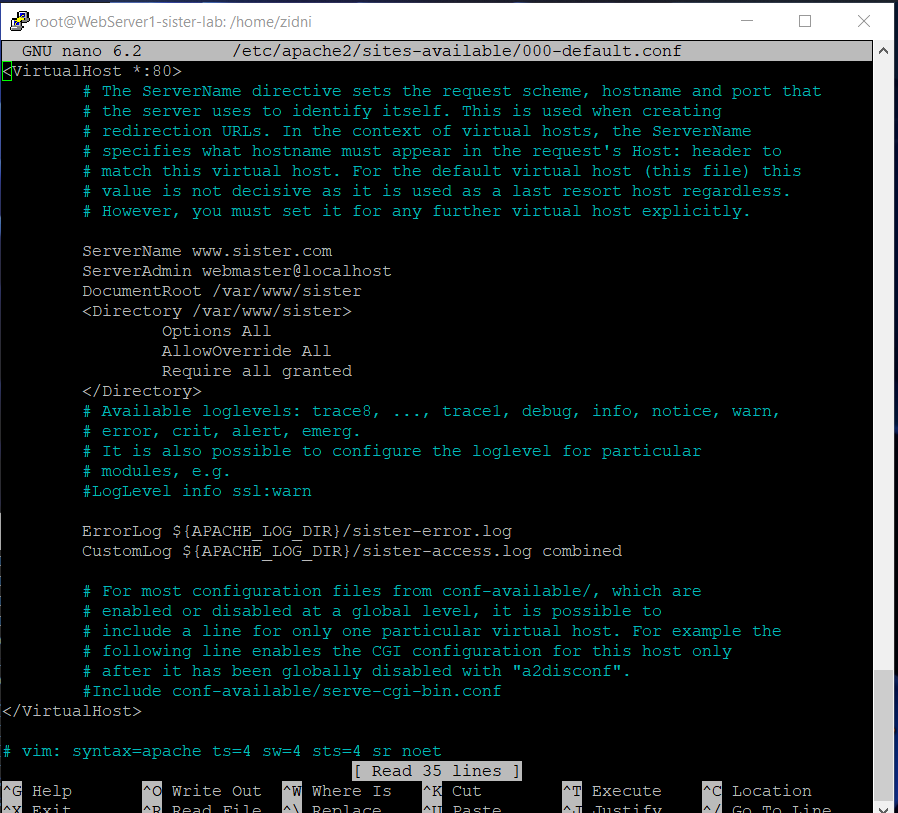
Then create a new virtual host by way of :
sudo nano /etc/apache2/sites-available/000-default.conf- Add a configuration line to the existing one
<VirtualHost *:80> ... ServerName sister.com ... DocumentRoot /var/www/sister <Directory /var/www/sister> Options All AllowOverride All Require all granted </Directory> ErrorLog ${APACHE_LOG_DIR}/sister-error.log CustomLog ${APACHE_LOG_DIR}/sister-access.log combined ... </VirtualHost *:80>- So that it is more or less as follows
-
Restart the Apache Webserver by way of
sudo systemctl restart apache2 -
DO THE ABOVE STEPS ON WEB SERVER 2 AS WELL
-
Check the web server using the ip in the web browser
- Results

F. Configuring Load Balancer
-
First we will install keepalived with the command
sudo apt install keepalived -y -
Then we will create the keepalived.conf file in the specified folder with the command
sudo nano /etc/keepalived/keepalived.conf -
There are 2 configurations on the MASTER and BACKUP Load balancer servers
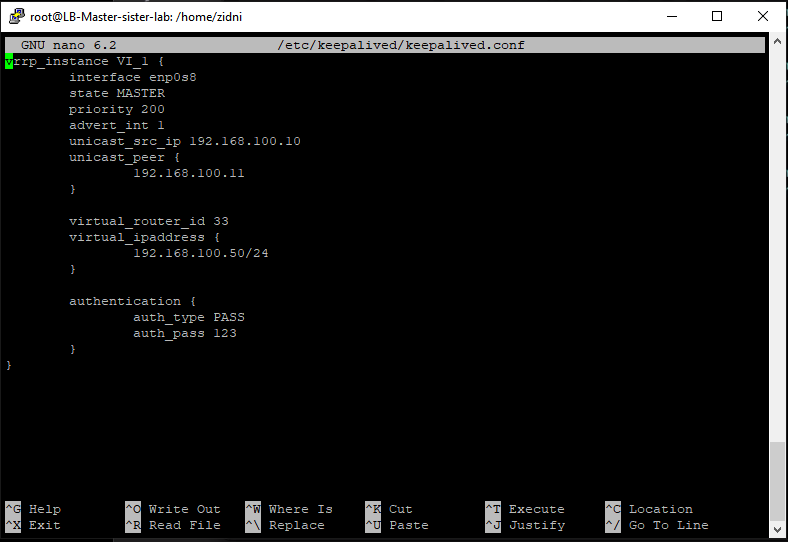
- Master Server Load Balancer
vrrp_instance VI_1 { interface enp0s8 state MASTER priority 200 advert_int 1 unicast_src_ip 192.168.100.10 unicast_peer { 192.168.100.11 } virtual_router_id 33 virtual_ipaddress { 192.168.100.50/24 } authentication { auth_type PASS auth_pass 123 } }- Backup Server Load Balancer
vrrp_instance VI_1 { interface enp0s8 state BACKUP priority 100 advert_int 1 unicast_src_ip 192.168.100.11 unicast_peer { 192.168.100.10 } virtual_router_id 33 virtual_ipaddress { 192.168.100.50/24 } authentication { auth_type PASS auth_pass 123 } }- Note:
- interface according to the interface that we install on the VM
- state in the declaration according to Backup / Master
- Priority on Master must be higher than Backup
- unicast_src_ip: according to the IP of the node itself
- unicast_peer: according to the backup IP or vice versa
- virtual_ipaddress: according to the VIP that we created earlier
- Here is the Load Balancer Master config
-
Then restart keepalived on both servers with the command
systemctl restart keepalived -
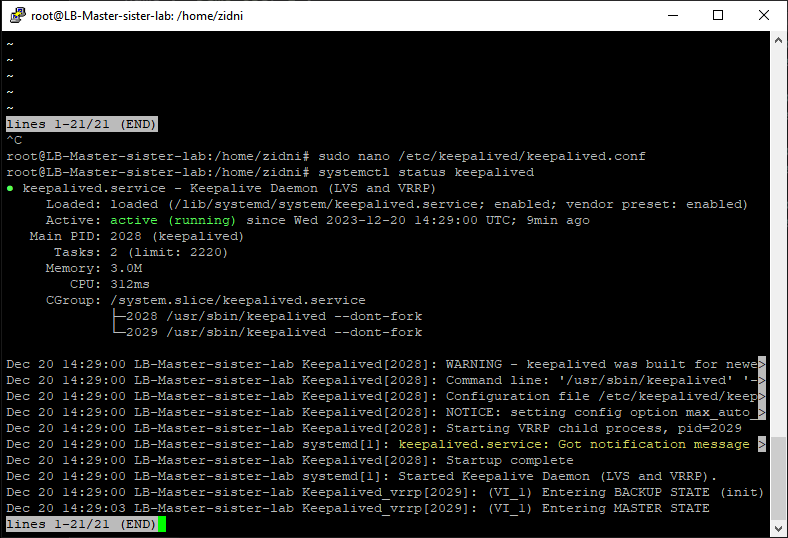
Check the keepalived status with the command
systemctl status keepalived- Here's an example of keepalived status on the Master Load Balancer server
Verify
A. Proof HA Web server 1 and 2
- By accessing the load balancer ip or domain that we have set and refreshing the page repeatedly2
- Can the web server be accessed by both?
- If web server 1 dies, can only web server 2 be displayed?
- If web server 2 dies, only web server 1 can be displayed?

-
By accessing the logs from the load balancer itself, but to make it clear we will install "ccze" on the LB Master with the command
apt install ccze- Then access the log in the /var/log/nginx/access.log folder with the command
tail -f /var/log/nginx/access.log | ccze- Then try to refresh the Virtual IP repeatedly, here is an example
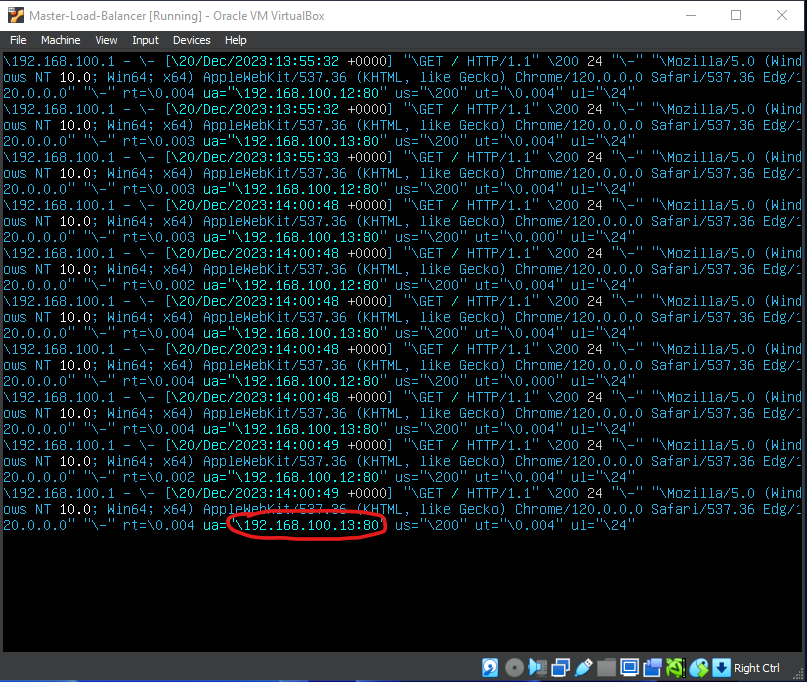
- Pay attention to the red circle
- Is the IP generated alternately between Web servers 1 and 2?
- If one of the Web IPs is turned off, will there only be 1 ip that is on and vice versa?
B. Proof of HA LB Master and LB Backup
-
In testing the Load Balancer here, we will try to turn off 1 LB master, then check the keepalived status on the LB master or LB backup.
systemctl status keepalived- Here is an example of the output of the command on LB Master
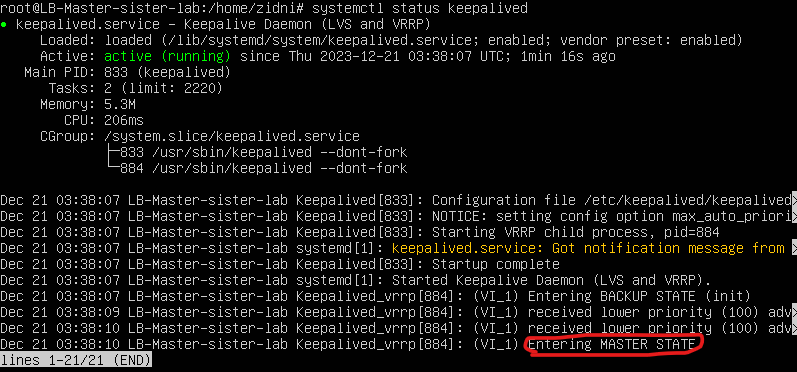
- Note on the red circled one, that the LB master shows the master state
- Then is an example of output from LB Backup
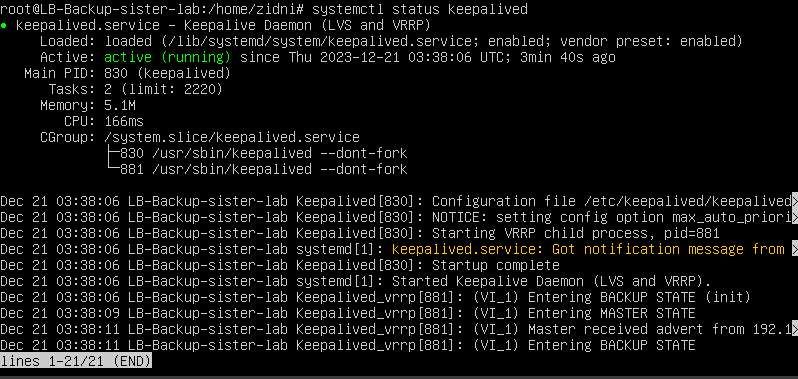
- Then we will try to test by entering down time on LB Master with the command to turn off the node or turn off keepalived on LB Master.
- Does the LB backup change status to "Entering MASTER STATE"?
- If the LB master server enters uptime, does the status on keepalived become "Entering MASTER STATE"?
- Does the LB backup change back to "BACKUP STATE"?