
Post Installation OCP on AWS (part 2)
OpenShift Container Platform after deployment on AWS. This guide covers post-install checks, access setup, and best practices to ensure your OCP cluster.
Introduction
In part one, we have successfully created our OpenShift Container Platform (OCP) cluster using the Installer-Provisioned Infrastructure (IPI) method. This approach provides a streamlined and automated way to deploy OpenShift, allowing the installer to handle most of the infrastructure setup, configuration, and integration with the chosen cloud provider. By using IPI, we can focus more on exploring and building upon the cluster rather than spending time on manual provisioning. With the cluster now up and running, we’re ready to move forward and dive deeper into configuring and optimizing our environment for real-world use cases.
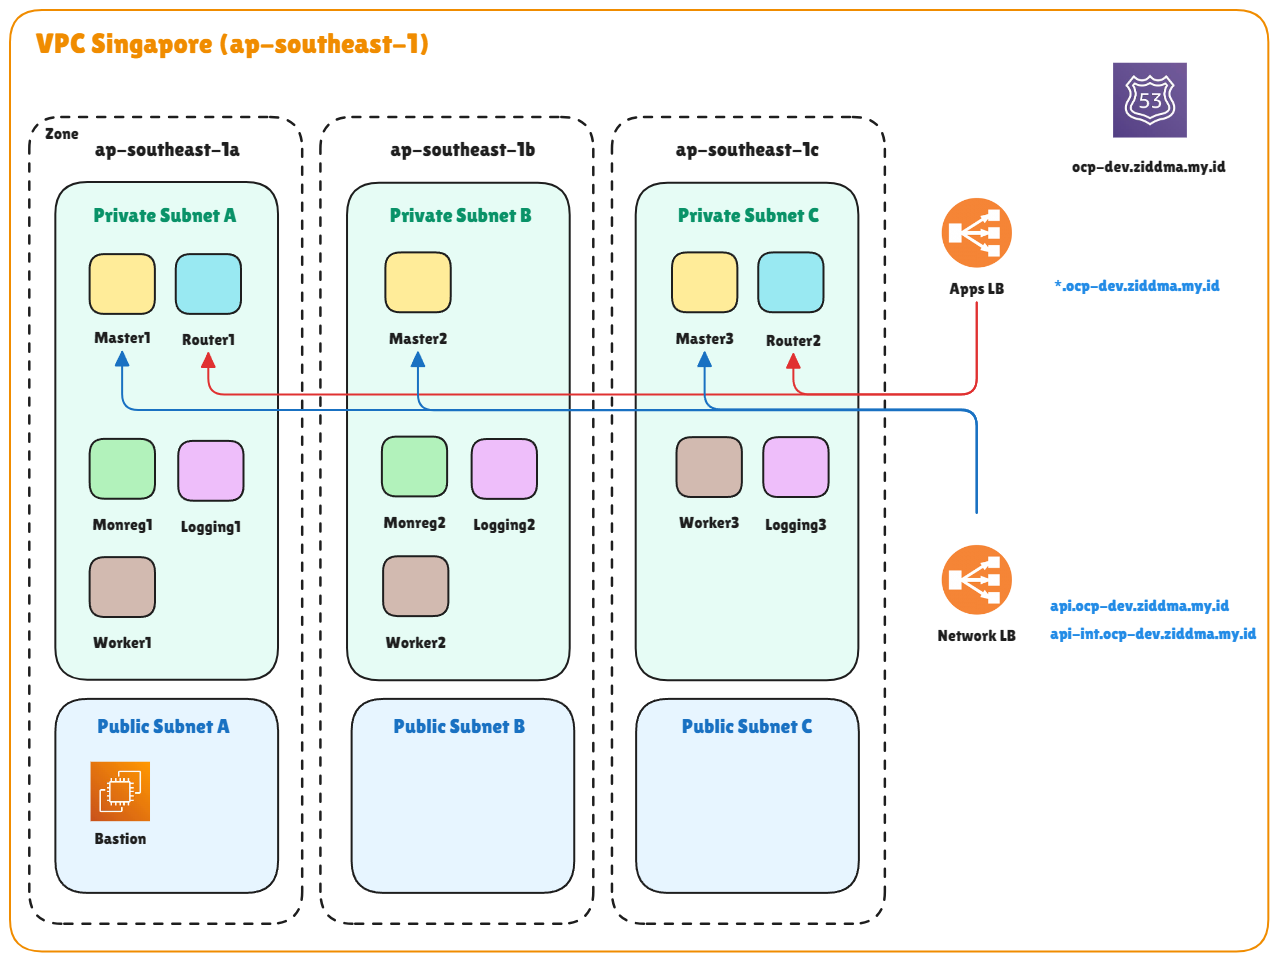
Topology
In this topology, I’ve committed to providing detailed post-installation steps that will be applied to this cluster. For this setup, I’ll be referencing OpenShift Container Platform version 4.18. There are notable differences between OCP versions 4.16 and earlier compared to 4.18 and later, especially in terms of supported technologies and architectural improvements. In versions 4.16 and below, OpenShift still relied heavily on the OpenShift SDN as its default networking stack. While functional, it had limited scalability and flexibility compared to the newer OVN-Kubernetes model introduced in later releases. Starting from 4.17 onward, OpenShift began fully adopting OVN-Kubernetes, offering better performance, enhanced security, and improved network policy management aligned with upstream Kubernetes standards.
Another major change involves the logging subsystem. In older versions (≤4.16), OpenShift utilized the Elasticsearch, Fluentd, and Kibana (EFK) stack for centralized logging. However, beginning with version 4.17 and above (including 4.18), OpenShift transitioned to using LokiStack based on Grafana Loki as the default logging solution. Loki provides a more lightweight, scalable, and cost-efficient approach to storing and querying logs. While Elasticsearch can still be integrated, its role is now primarily limited to acting as a log forwarder rather than the main storage and visualization engine. In summary, OpenShift 4.18 embodies a more modern, cloud-native direction, offering improved network performance, simplified management, and an updated logging architecture that better aligns with the broader Kubernetes ecosystem.
Prerequisite
- CLI Access to OCP cluster
- Web Console OCP
- Aws Console
Post Installation
A. Add Admin User
Create dedicated admin user is standard post-installation step for every OCP cluster, this user serves as the primary cluster administrator, as the default 'kubeadmin' user is temporary and should be removed according to best practices
-
Create local Identity Provider htpasswd
sudo apt install apache2-utils -y htpasswd -c -B -b user.htpasswd adminocp P@ssw0rd htpasswd -B -b user.htpasswd <another_user> <password> -
Create secret
# Delete old identity provider in secret when you already have oc delete secret htpass-secret -n openshift-config # Jump for this step if you first time configuration oc create secret generic htpass-secret --from-file htpasswd=user.htpasswd -n openshift-config -
Edit oauth
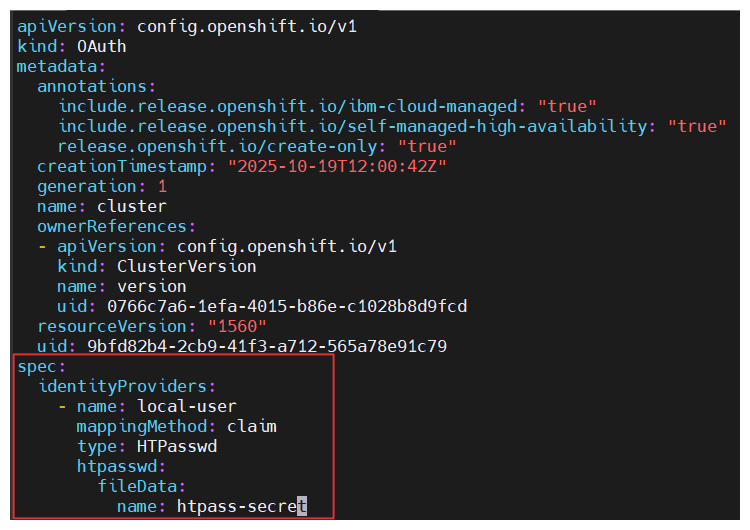
# Refer cluster OCP with identity provider name oc get oauth cluster -o yaml > oauth.yaml vim oauth.yamlspec: identityProviders: - htpasswd: fileData: name: htpass-secret mappingMethod: claim type: HTPasswd name: local-users# Apply policy oc replace -f oauth.yaml -
Add cluster-admin role to user adminocp
# If u create a multiple user, you need to apply for all user oc adm policy add-cluster-role-to-user cluster-admin adminocp oc adm policy add-cluster-role-to-user cluster-admin <another_user> -
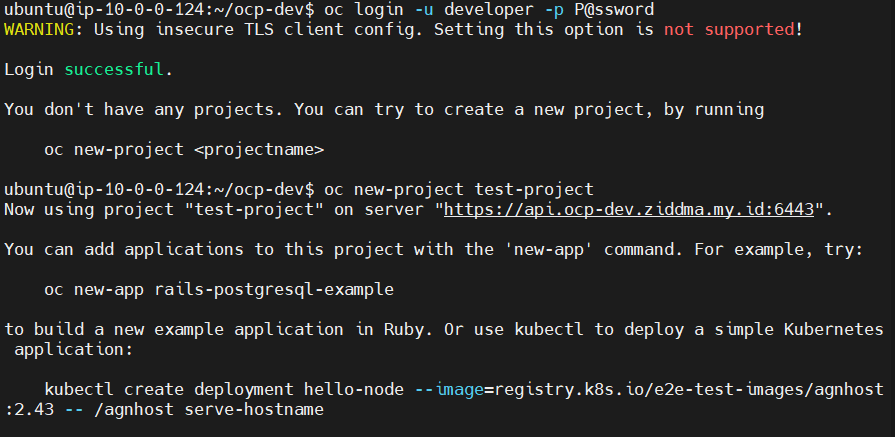
Verify Login user adminocp or login via internal API CLI
oc login -u adminocp -p <your_created_password>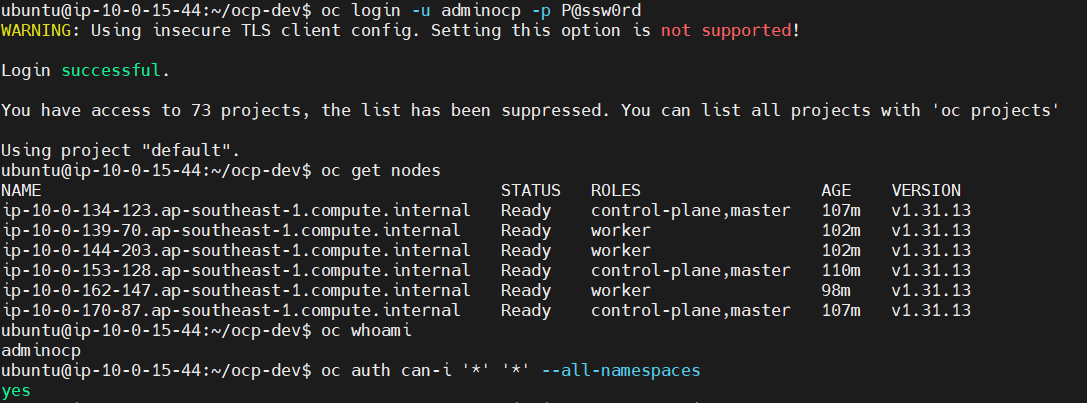
B. Machine Config Pool
Machine Config Pool (MCP) works by grouping the types of infrastructure that we will create later, in part 1 there is a topology explained we will use 3 types of infrastructure nodes namely : Router, Logging, and Monreg. From each infrastructure node is template take from worker
Repeat this step for Router, Logging, Monreg
- router
- logging
- monreg
-
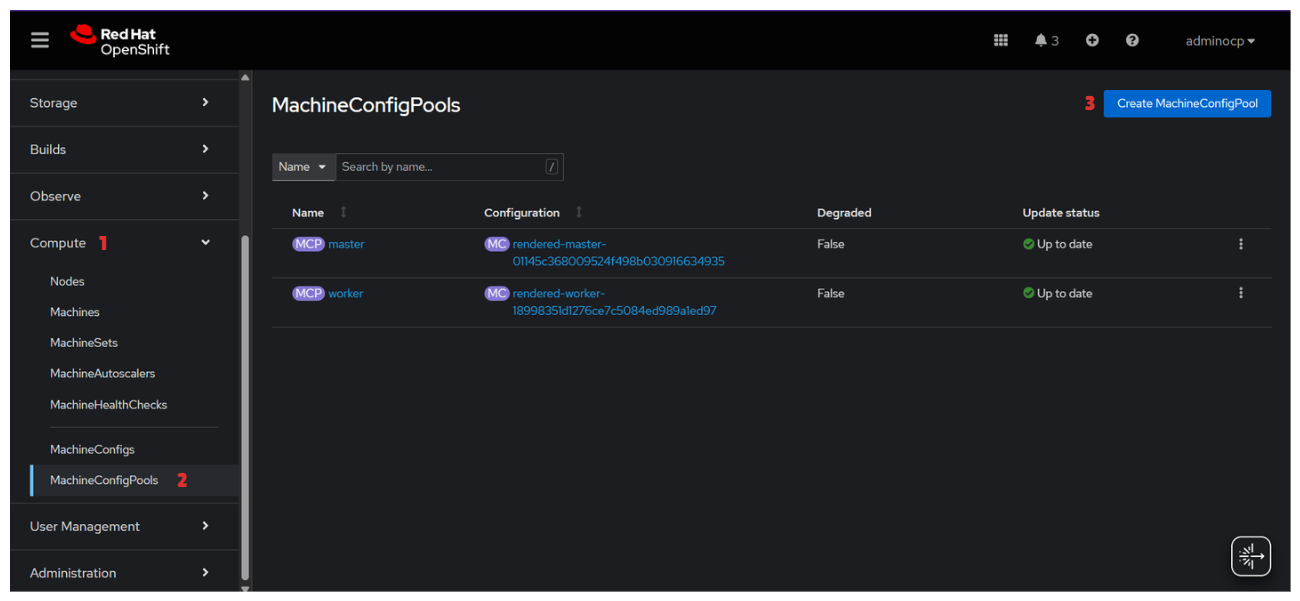
Login Dashboard Menu → Compute→ MachineConfigPools→ Create MachineConfigPools
apiVersion: machineconfiguration.openshift.io/v1 kind: MachineConfigPool metadata: name: router #CHANGE THIS# spec: machineConfigSelector: matchExpressions: - key: machineconfiguration.openshift.io/role operator: In values: - worker - router #CHANGE THIS# nodeSelector: matchLabels: node-role.kubernetes.io/router: "" #CHANGE THIS# -
Add label node-type worker config for project template later
for node in $(oc get nodes -l node-role.kubernetes.io/worker --no-headers -o custom-columns=":metadata.name"); do oc label node $node node-type=worker --overwrite done -
Verify Machine Config Pools
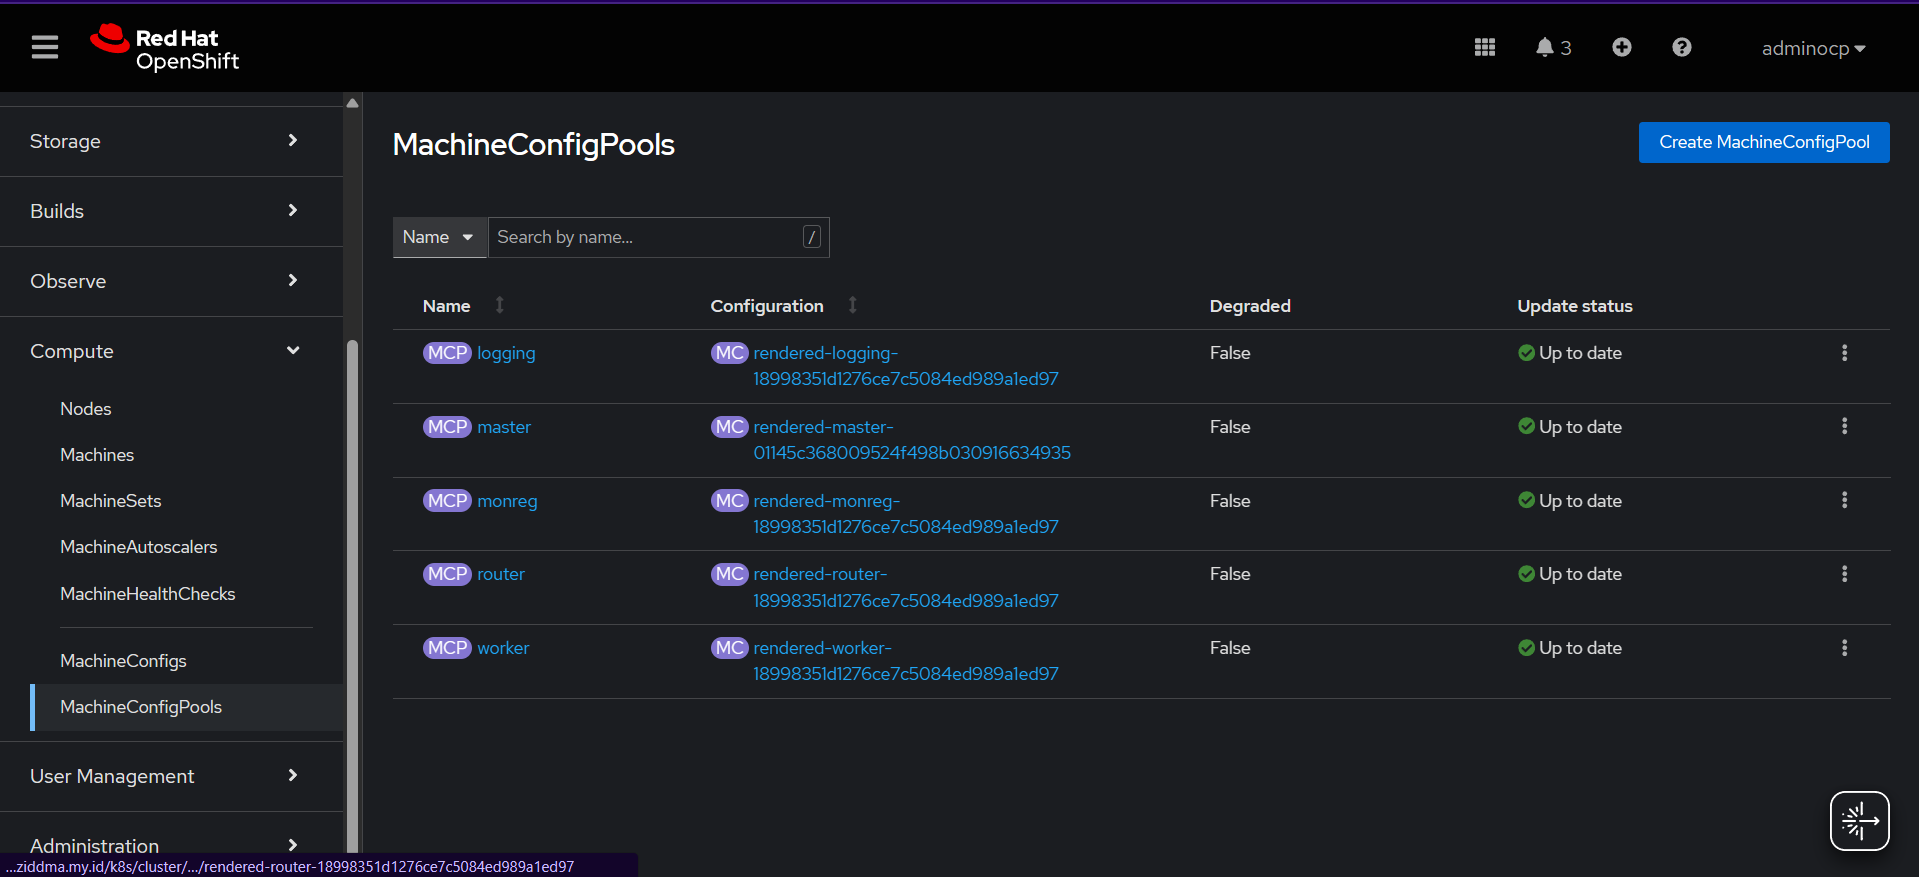
💡Others machine config pool will shown when the configuration apply correctly
-
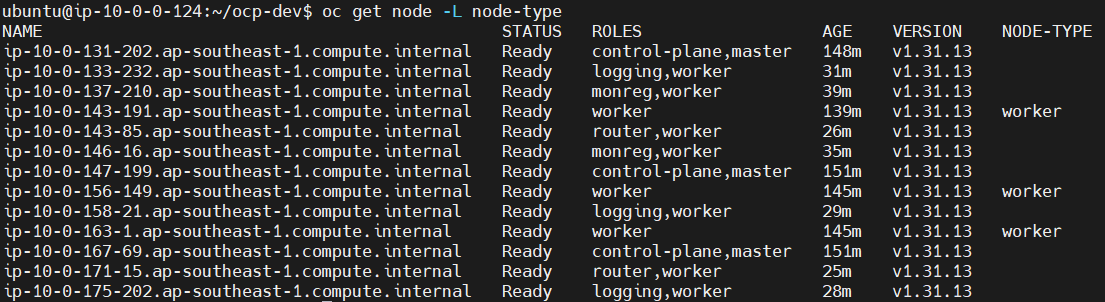
Verify node label to worker with node-type
oc get node -L node-type
C. Machine Sets
MachineSets in AWS OpenShift are used to automatically manage the configuration and deployment of EC2 instances. These instances are typically distributed across multiple AWS Availability Zones (AZs) based on the defined subnets to ensure high availability and fault tolerance. By default, MachineSets are used to manage worker nodes, and in a multi-zone setup. For example, using the ap-southeast-1 (Singapore) region with three AZs (a, b, and c) separate MachineSets should be defined for each zone. However, in this case, we will define MachineSets not only by zone but also by node type, separating those used for infra nodes and those for application workloads (worker nodes).
🚨 Before do configuration for machine sets, you need to identify these needs from your cluster, you need to access OCP bastion
Example :
-
How to get Infrastructure ID
<infrastructure_id> = ocp-dev-rdscr
oc get -o jsonpath='{.status.infrastructureName}{"\n"}' infrastructure cluster -
How to get AMI ID
<ami_id> = ami-0e22aa720418e43f5
oc -n openshift-machine-api \ -o jsonpath='{.spec.template.spec.providerSpec.value.ami.id}{"\n"}' \ get machineset/<infrastructure_id>-worker-ap-southeast-1a
-
Dashboard Menu → Compute → MachineSets → Create MachineSets
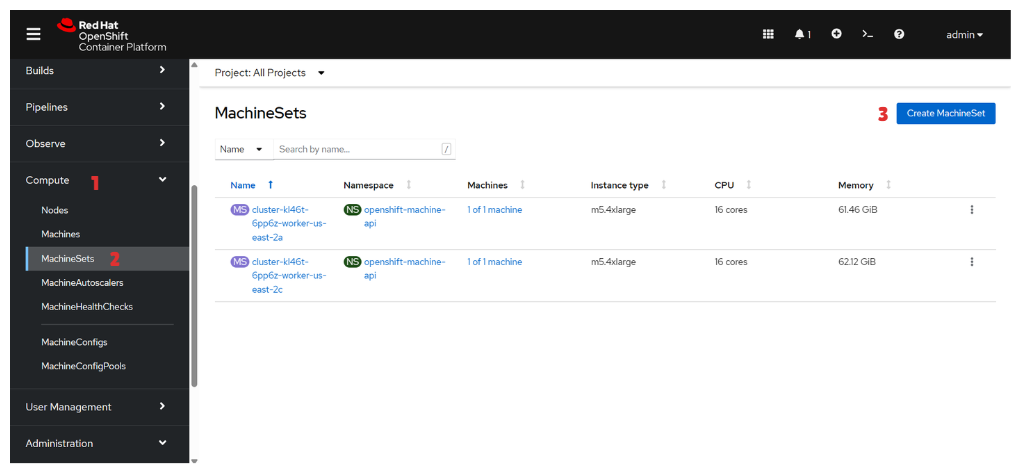
💡Repeat this step for Worker Node & Infra Node
Node Name Zone A Zone B Zone C Machine Spec worker ap-southeast-1a ap-southeast-1b ap-southeast-1c m5.4xlarge logging ap-southeast-1a ap-southeast-1b ap-southeast-1c m5.2xlarge monreg ap-southeast-1a ap-southeast-1b - m5.4xlarge router ap-southeast-1a - ap-southeast-1c m5.xlarge apiVersion: machine.openshift.io/v1beta1 kind: MachineSet metadata: name: <infrastructure_id>-monreg-ap-southeast-1a #CHANGE THIS# namespace: openshift-machine-api labels: machine.openshift.io/cluster-api-cluster: <infrastructure_id> #CHANGE THIS# spec: replicas: 1 selector: matchLabels: machine.openshift.io/cluster-api-cluster: <infrastructure_id> #CHANGE THIS# machine.openshift.io/cluster-api-machineset: <infrastructure_id>-monreg-ap-southeast-1a #CHANGE THIS# template: metadata: labels: machine.openshift.io/cluster-api-cluster: <infrastructure_id> #CHANGE THIS# machine.openshift.io/cluster-api-machine-role: monreg #CHANGE THIS# machine.openshift.io/cluster-api-machine-type: monreg #CHANGE THIS# machine.openshift.io/cluster-api-machineset: <infrastructure_id>-monreg-ap-southeast-1a #CHANGE THIS# spec: metadata: labels: node-role.kubernetes.io/monreg: "" #CHANGE THIS# providerSpec: value: apiVersion: machine.openshift.io/v1beta1 kind: AWSMachineProviderConfig ami: id: <ami_id> #CHANGE THIS# instanceType: m5.4xlarge #CHANGE THIS# iamInstanceProfile: id: <infrastructure_id>-worker-profile #CHANGE THIS# placement: availabilityZone: ap-southeast-1a #CHANGE THIS# region: ap-southeast-1 #CHANGE THIS# securityGroups: - filters: - name: tag:Name values: - <infrastructure_id>-node - filters: - name: tag:Name values: - <infrastructure_id>-lb subnet: filters: - name: tag:Name values: - <cluster_name>-subnet-private1-ap-southeast-1a #CHANGE THIS# blockDevices: - ebs: volumeSize: 100 volumeType: gp2 iops: 4000 credentialsSecret: name: aws-cloud-credentials userDataSecret: name: worker-user-data tags: - name: kubernetes.io/cluster/<infrastructure_id> #CHANGE THIS# value: owned -
Verify Machine Sets
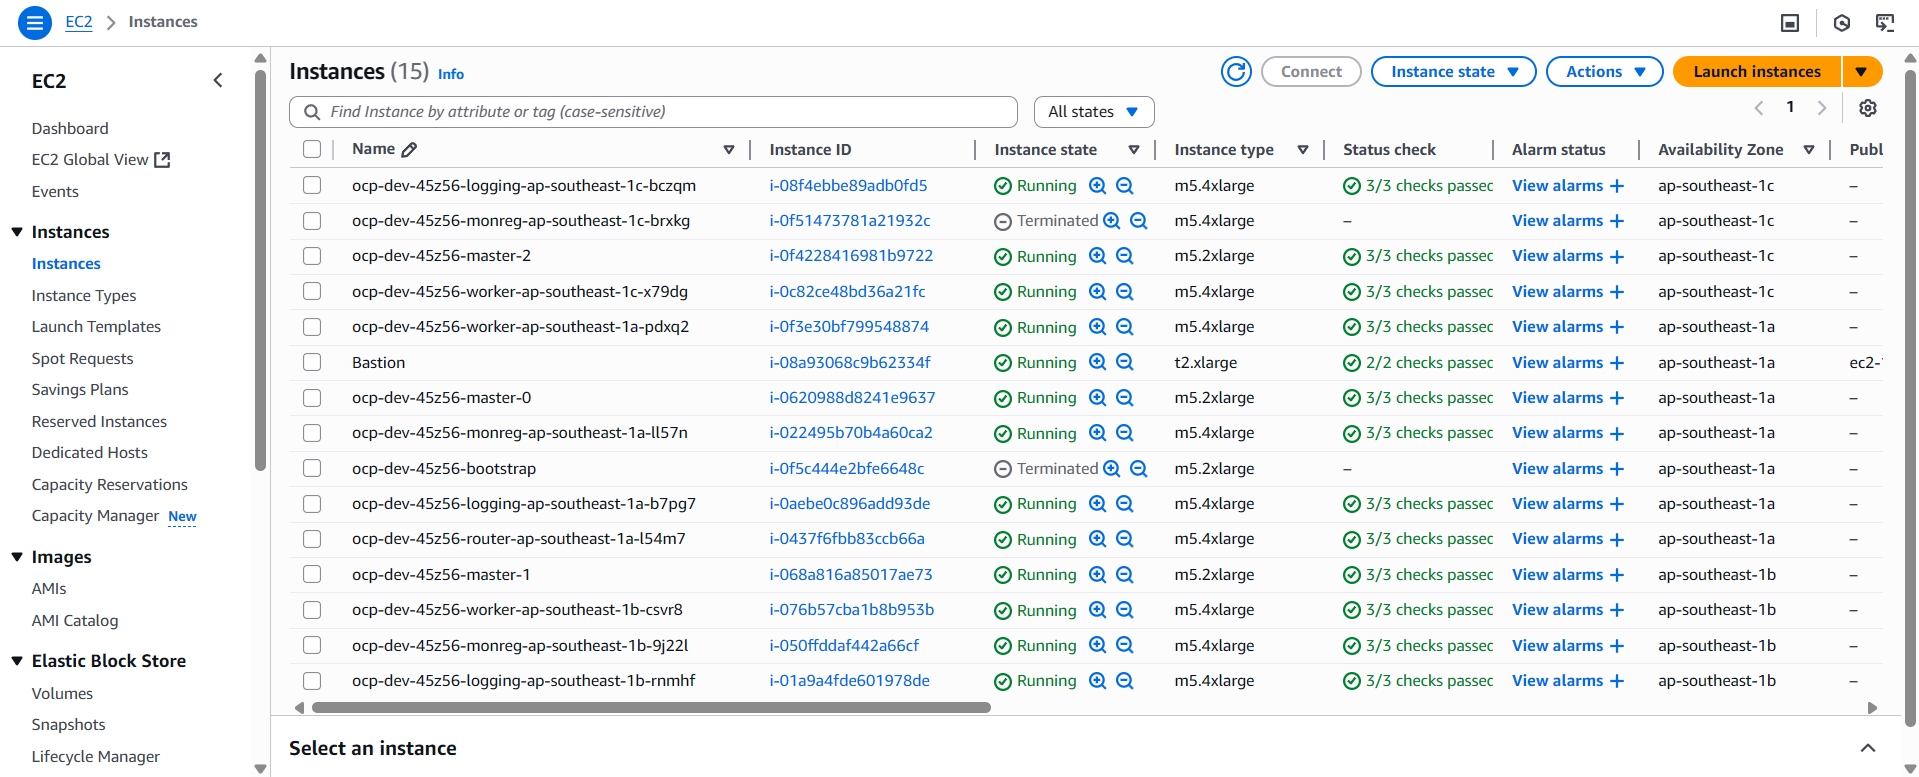
You can verify machine sets instance by looking in Machines section
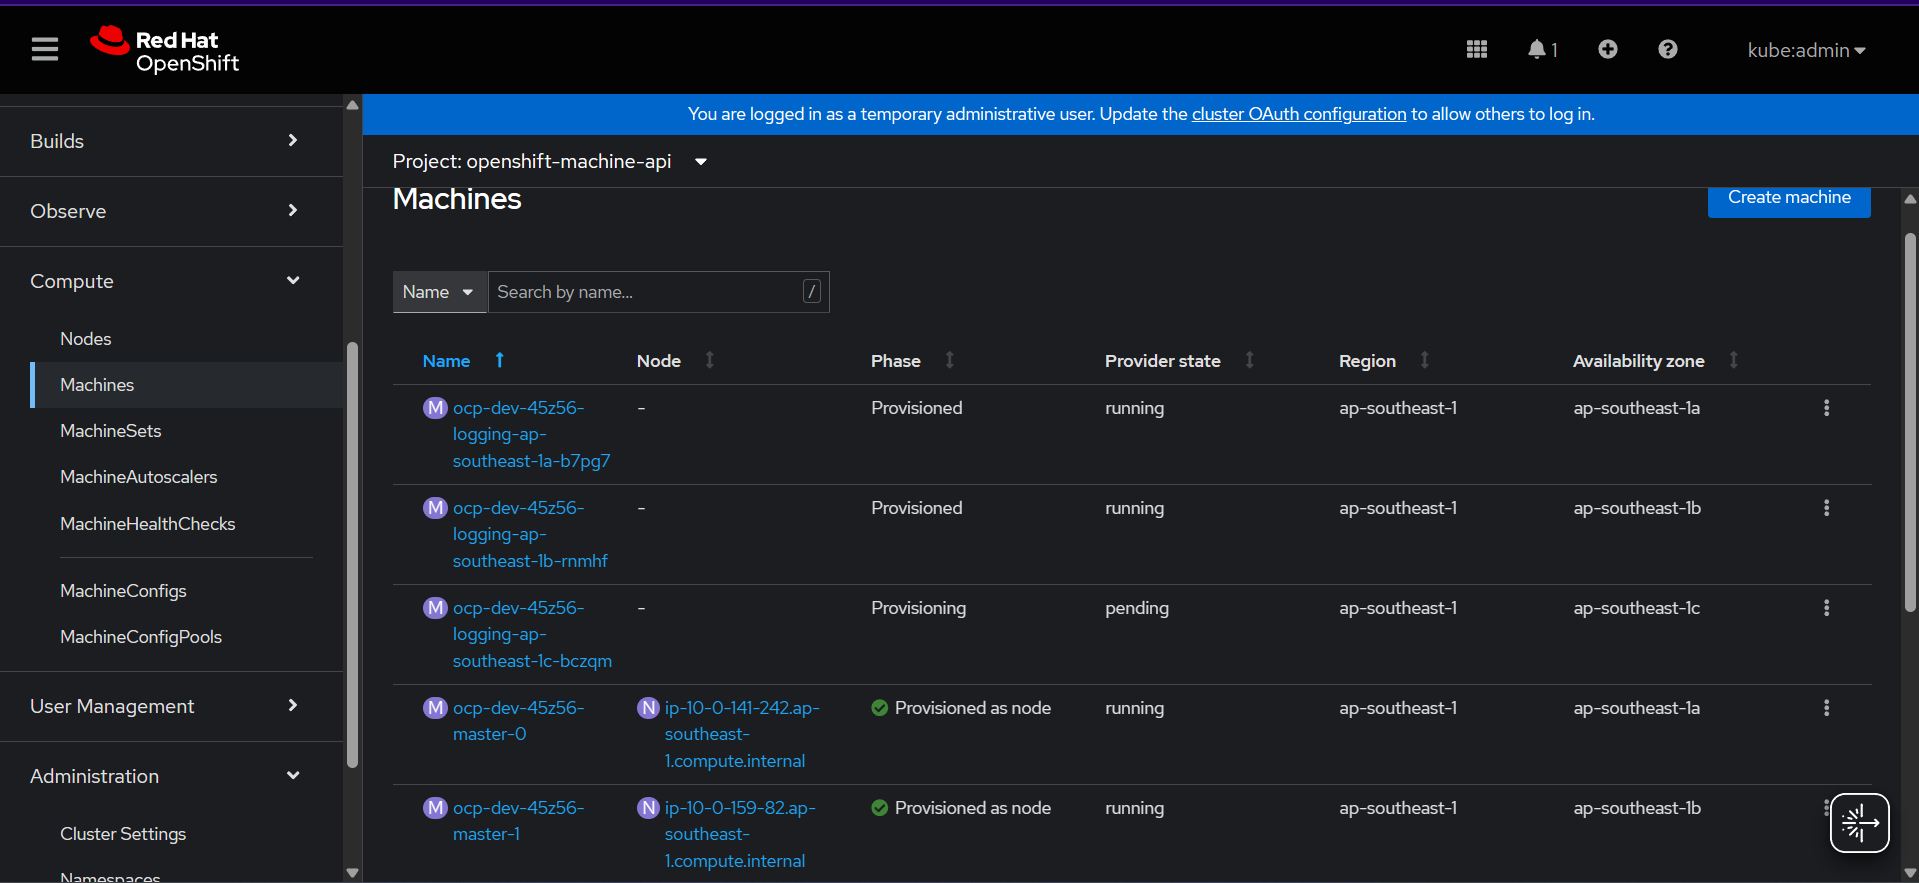
In the picture above when creating logging node the phase status set to provisioned, its mean your machine sets creation successfully made and waiting instance in aws fully up
Below are the successfully infra node created. The private IP address will be assigned and auto join to our cluster, pretty ezee right.. :”
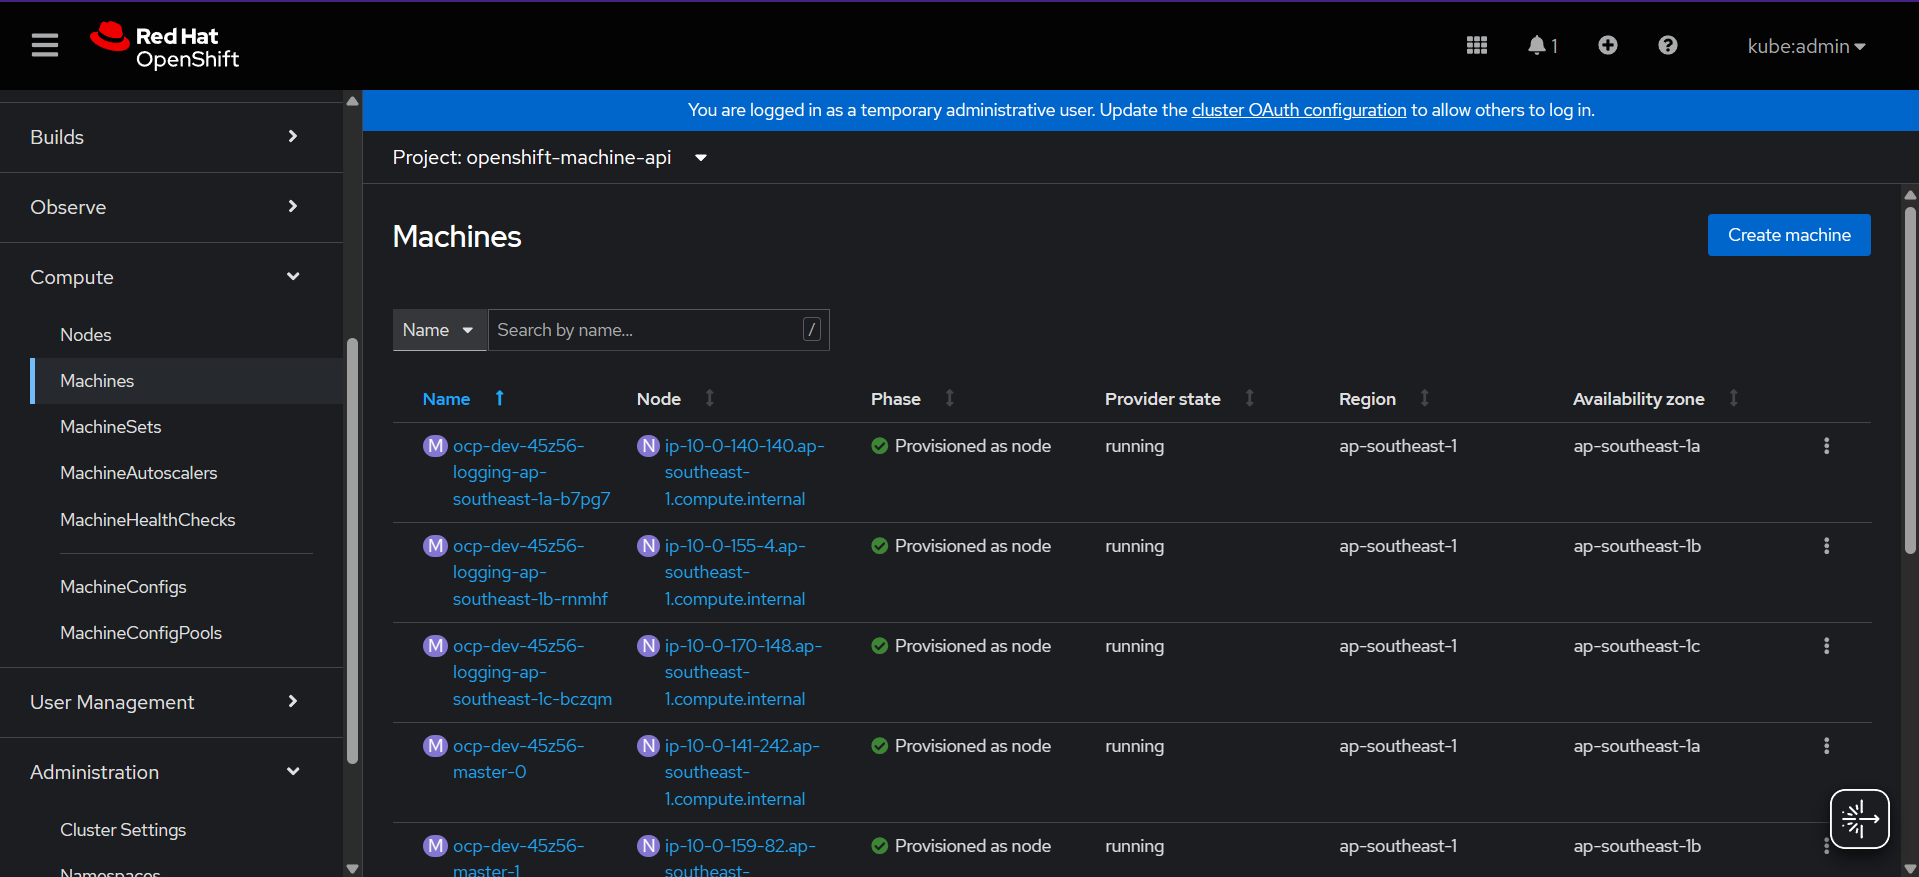
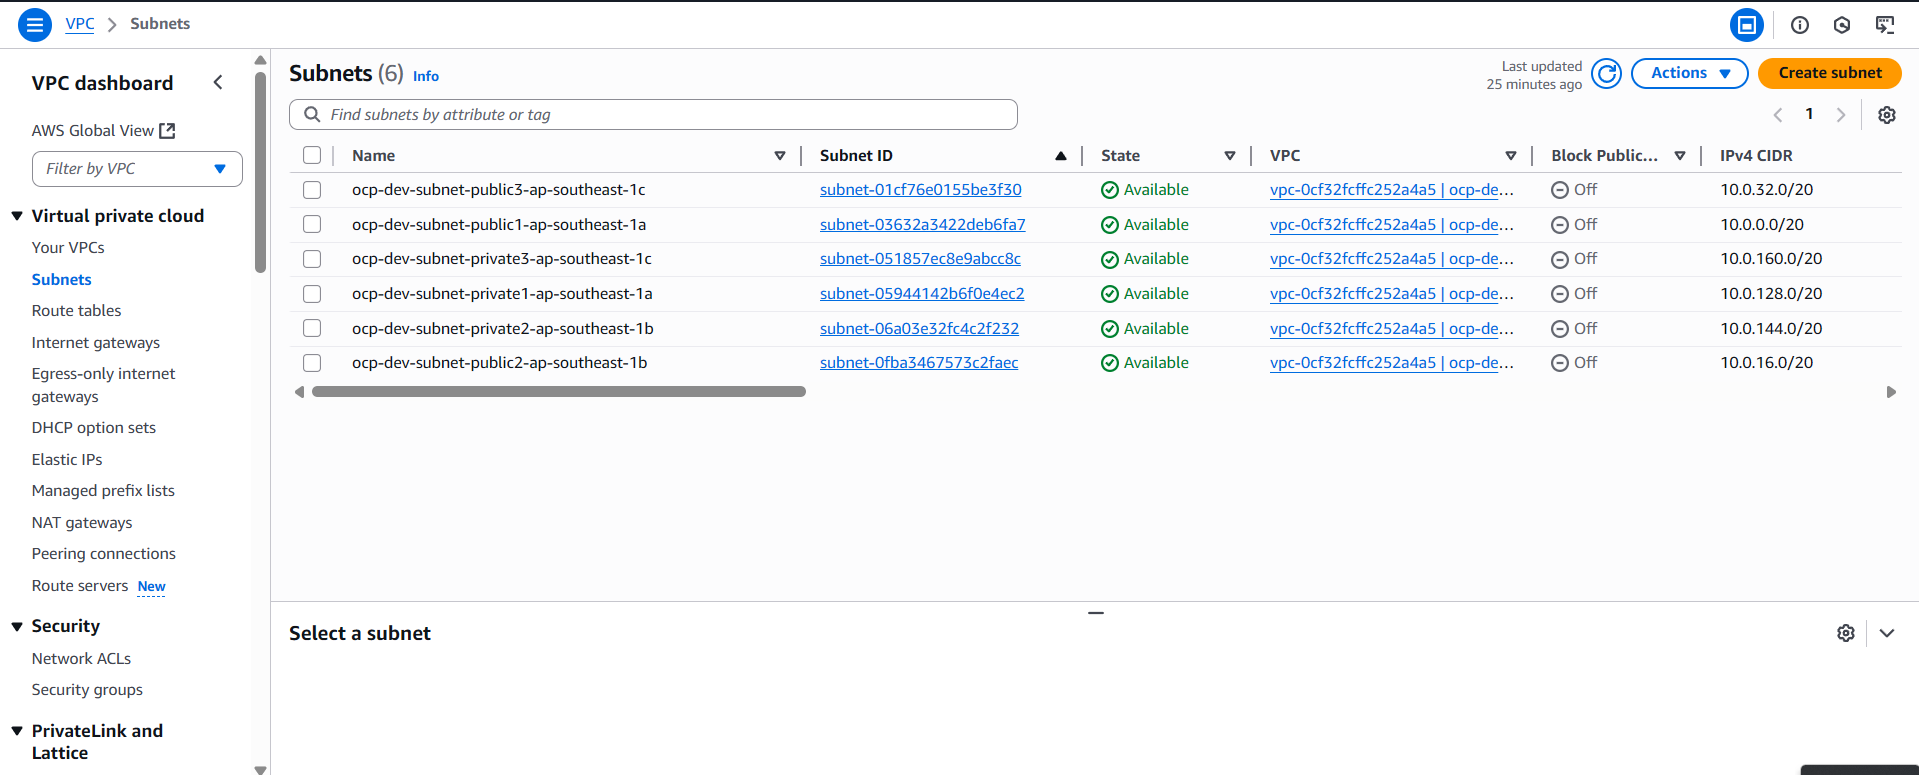
If you have encountered an error with subnet id. you can check the yaml machine sets and matching the name with in console
D. Project Template
💡Project templates are used to provision projects with predefined settings. In this case, we add node selectors so that when an application project is created, workloads are automatically scheduled on designated worker nodes. To ensure this works correctly, make sure that appropriate node labels have been applied to both worker and infra nodes. Additionally, you can disable self-provisioning of projects for regular users if needed.
-
Create Project template
#Create folder mkdir yaml_collections oc adm create-bootstrap-project-template -o yaml > yaml_collections/template.yaml vim yaml_collections/template.yamlapiVersion: config.openshift.io/v1 kind: Template metadata: creationTimestamp: null name: project-request objects: - apiVersion: project.openshift.io/v1 kind: Project metadata: annotations: openshift.io/description: ${PROJECT_DESCRIPTION} openshift.io/display-name: ${PROJECT_DISPLAYNAME} openshift.io/requester: ${PROJECT_REQUESTING_USER} openshift.io/node-selector: "node-type=worker" #ADD THIS# creationTimestamp: null name: ${PROJECT_NAME} spec: {} status: {} - apiVersion: rbac.authorization.k8s.io/v1 kind: RoleBinding metadata: creationTimestamp: null name: admin namespace: ${PROJECT_NAME} roleRef: apiGroup: rbac.authorization.k8s.io kind: ClusterRole name: admin subjects: - apiGroup: rbac.authorization.k8s.io kind: User name: ${PROJECT_ADMIN_USER} parameters: - name: PROJECT_NAME - name: PROJECT_DISPLAYNAME - name: PROJECT_DESCRIPTION - name: PROJECT_ADMIN_USER - name: PROJECT_REQUESTING_USERoc apply -f yaml_collections/template.yaml -n openshift-config -
Edit project config
oc edit project.config.openshift.io/cluster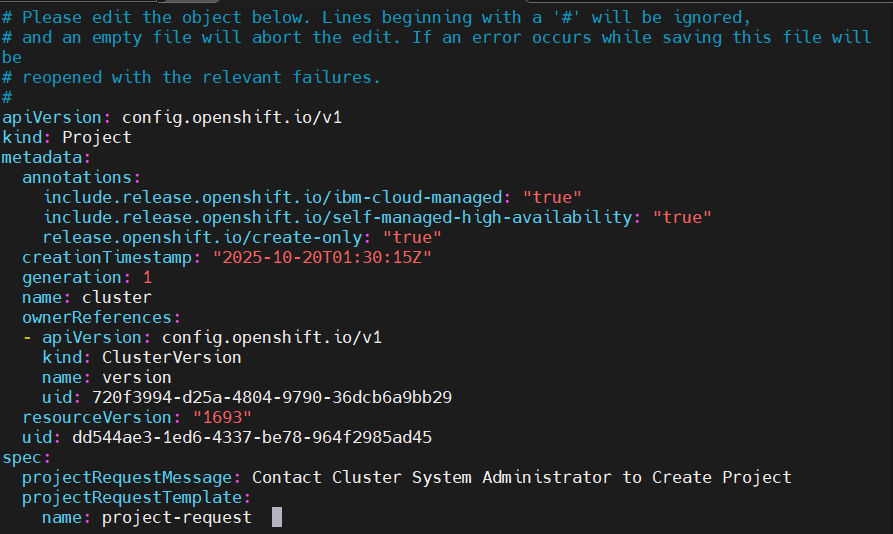
spec: projectRequestMessage: Contact Cluster System Administrator to Create Project projectRequestTemplate: name: project-request -
Disable self provisioning project for basic user
oc adm policy remove-cluster-role-from-group self-provisioner system:authenticated:oauth #Disable automatic update to cluster role# oc patch clusterrolebinding.rbac self-provisioners -p '{ "metadata": { "annotations": { "rbac.authorization.kubernetes.io/autoupdate": "false" } } }' -
Wait for pod in namespace in openshift-apiserver for rolling new pod in new age
watch oc get pod -n openshift-apiserver -
Verify Project Template for self provision project
oc new-project test-project --as=<user_with_basic_role> --as-group=system:authenticated --as-group=system:authenticated:oauthExpected output

How to enable self provision project
oc adm policy add-cluster-role-to-group self-provisioner system:authenticated:oauth oc patch clusterrolebinding.rbac self-provisioners -p '{ "metadata": { "annotations": { "rbac.authorization.kubernetes.io/autoupdate": "true" } } }' -
Verify Project Template for node selector worker
Verify basic-user create project from template add node selector
#a. Check node role# oc get node -o wide #b. Change project to test app workload# oc login -u <basic-user> -p <user-password> oc new-project test-project #c. Create test app# oc new-app https://github.com/rgerardi/hellogo.git #d. Scale replica pod to make sure app only run in worker node# oc scale deployment/hellogo --replicas=10Expected output :
-
Check Node role
-
Change project to test app workload
-
Create test app
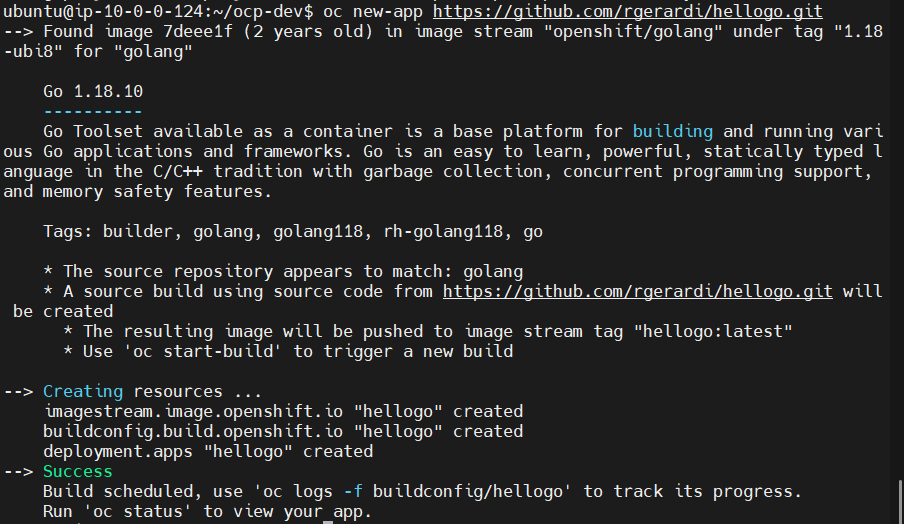
-
Scale app verify run in worker node


Delete recent testing project
oc login -u admin -p <password-admin> oc delete project test-project oc delete user <basic_user> -
E. Garbage Collection
Garbage Collection is use to automatically control node resource usage by removing unused images or by limiting the resource usage of pods scheduled on worker nodes. Garbage Collection is related to cleaning up images that are not being used by any running pods.
When limiting resources with Garbage Collection, there are two main parameters: soft eviction and hard eviction. Soft eviction works with a specified grace period, while hard eviction immediately triggers deletion once the threshold is reached, with no waiting period. This mechanism helps prevent resource oscillation. Additionally, Garbage Collection can be configured to prune images based on specific disk usage percentages.
-
Create file with name garbage-collection.yaml
apiVersion: machineconfiguration.openshift.io/v1 kind: KubeletConfig metadata: name: worker-kubeconfig spec: machineConfigPoolSelector: matchLabels: pools.operator.machineconfiguration.openshift.io/worker: "" kubeletConfig: #Config for node resource# evictionSoft: memory.available: "500Mi" nodefs.available: "10%" nodefs.inodesFree: "5%" imagefs.available: "15%" imagefs.inodesFree: "10%" evictionSoftGracePeriod: memory.available: "1m30s" nodefs.available: "1m30s" nodefs.inodesFree: "1m30s" imagefs.available: "1m30s" imagefs.inodesFree: "1m30s" evictionHard: memory.available: "200Mi" nodefs.available: "5%" nodefs.inodesFree: "4%" imagefs.available: "10%" imagefs.inodesFree: "5%" evictionPressureTransitionPeriod: 3m #Config for unused images# imageMinimumGCAge: 5m imageGCHighThresholdPercent: 75 imageGCLowThresholdPercent: 60 -
Apply configuration
oc apply -f garbage-collection.yaml -
Verify config in machine config pool
oc get mcp
💡If the updating status change to true the config of garbage collection are running succeed apply to worker role, you need to watch the status until updating status change to false it approximately around 5 minutes, depends on how many are worker

F. Automated ETCD backup
The etcd backup is performed to comply with organizational policies, ensuring that all cluster configurations are safely stored. In case of corruption or loss of cluster settings, the etcd backup provides the necessary data to restore the cluster to its previous state.
-
Create project for etcd backup
oc new-project ocp-etcd-backup --description "Openshift Backup Automation Tool" --display-name "Backup ETCD Automation" -
Setup Service Account, Cluster role, Cluster Role Binding
vim etcd-backup.yaml# Service Account kind: ServiceAccount apiVersion: v1 metadata: name: openshift-backup namespace: ocp-etcd-backup labels: app: openshift-backup --- # Cluster Role apiVersion: rbac.authorization.k8s.io/v1 kind: ClusterRole metadata: name: cluster-etcd-backup rules: - apiGroups: [""] resources: - "nodes" verbs: ["get", "list"] - apiGroups: [""] resources: - "pods" - "pods/log" verbs: ["get", "list", "create", "delete", "watch"] --- # Cluster Role Binding kind: ClusterRoleBinding apiVersion: rbac.authorization.k8s.io/v1 metadata: name: openshift-backup labels: app: openshift-backup subjects: - kind: ServiceAccount name: openshift-backup namespace: ocp-etcd-backup roleRef: apiGroup: rbac.authorization.k8s.io kind: ClusterRole name: cluster-etcd-backupoc apply -f etcd-backup.yaml -
Config service account with special privilege
oc adm policy add-scc-to-user privileged -z openshift-backup -
Create Cronjob name cronjob-etcd-bkp.yaml
💡in this configuration you can set schedule with your organization agreement to backup. You can change the directory backup to another node or just send to bastion
kind: CronJob apiVersion: batch/v1 metadata: name: openshift-backup namespace: ocp-etcd-backup labels: app: openshift-backup spec: schedule: "56 23 * * *" #CHANGE THIS# concurrencyPolicy: Forbid successfulJobsHistoryLimit: 5 failedJobsHistoryLimit: 5 jobTemplate: metadata: labels: app: openshift-backup spec: backoffLimit: 0 template: metadata: labels: app: openshift-backup spec: containers: - name: backup image: "registry.redhat.io/openshift4/ose-cli" command: - "/bin/bash" - "-c" - oc get no -l node-role.kubernetes.io/master --no-headers -o name | xargs -I {} -- oc debug {} --to-namespace=ocp-etcd-backup -- bash -c 'chroot /host sudo -E /usr/local/bin/cluster-backup.sh /home/core/backup/ && chroot /host sudo -E find /home/core/backup/ -type f -mmin +"1" -delete' restartPolicy: "Never" terminationGracePeriodSeconds: 30 activeDeadlineSeconds: 500 dnsPolicy: "ClusterFirst" serviceAccountName: "openshift-backup" serviceAccount: "openshift-backup" -
Verify
💡To verify scheduled etcd backup was running, we can force to job immediate running and create backup file of etcd
oc create job backup --from=cronjob/openshift-backupCheck pod running on ocp-etcd-backup namespace like down below


Check inside master node
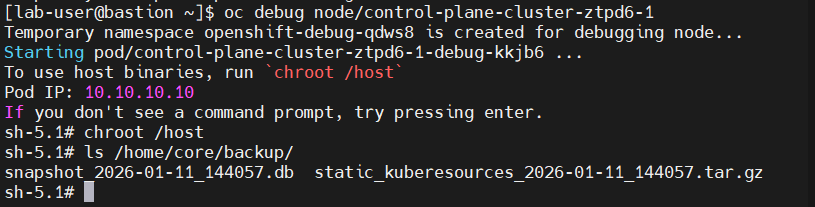
After backing up the etcd cluster database, we can retain the etcd data by storing it on a persistent volume within the cluster. This approach ensures that, in the event of an etcd-related issue in the future, the etcd database can be restored reliably.
Node Infra Configuration
In this section, we will configure the infrastructure nodes for routing, monitoring, and the container registry to ensure they run on the infrastructure nodes that were created previously. To configure the image registry, we will use NFS storage provisioned from NetApp to store the image registry volume, so we just setup the pvc for persistent volume for image registry cluster This configuration is intended to prevent these workloads from being scheduled on worker or master nodes.
A. Ingress / Router
-
Edit existing ingresscontroller
oc edit ingresscontrollers default -n openshift-ingress-operator -
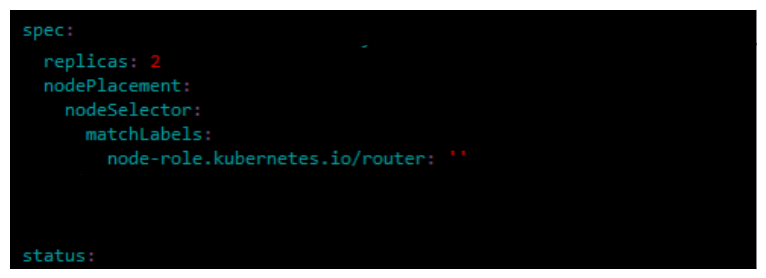
Add configuration node selector
kind: IngressController apiVersion: operator.openshift.io/v1 metadata: name: default namespace: openshift-ingress-operator spec: ...output omitted... replicas: 2 nodePlacement: nodeSelector: matchLabels: node-role.kubernetes.io/router: "" ...output omitted...
B. Monitoring
-
Verify or ensure the ConfigMap cluster-monitoring-config
oc get configmap cluster-monitoring-config -n openshift-monitoring vim cm-openshift-monitoring.yaml -
Create ConfigMap
apiVersion: v1 kind: ConfigMap metadata: name: cluster-monitoring-config namespace: openshift-monitoring data: config.yaml: | alertmanagerMain: nodeSelector: node-role.kubernetes.io/monreg: "" volumeClaimTemplate: spec: storageClassName: gp3-csi resources: requests: storage: 10Gi prometheusK8s: nodeSelector: node-role.kubernetes.io/monreg: "" volumeClaimTemplate: spec: storageClassName: gp3-csi resources: requests: storage: 200Gi retention: 7d retentionSize: 10GB prometheusOperator: nodeSelector: node-role.kubernetes.io/monreg: "" grafana: nodeSelector: node-role.kubernetes.io/monreg: "" k8sPrometheusAdapter: nodeSelector: node-role.kubernetes.io/monreg: "" kubeStateMetrics: nodeSelector: node-role.kubernetes.io/monreg: "" telemeterClient: nodeSelector: node-role.kubernetes.io/monreg: "" openshiftStateMetrics: nodeSelector: node-role.kubernetes.io/monreg: "" thanosQuerier: nodeSelector: node-role.kubernetes.io/monreg: "" -
Apply Configuration
oc apply -f cm-openshift-monitoring.yaml -n openshift-monitoring
C. Registry
-
Create PVC Storage → PersistentVolumeClaims → Create PersistentVolumeClaim
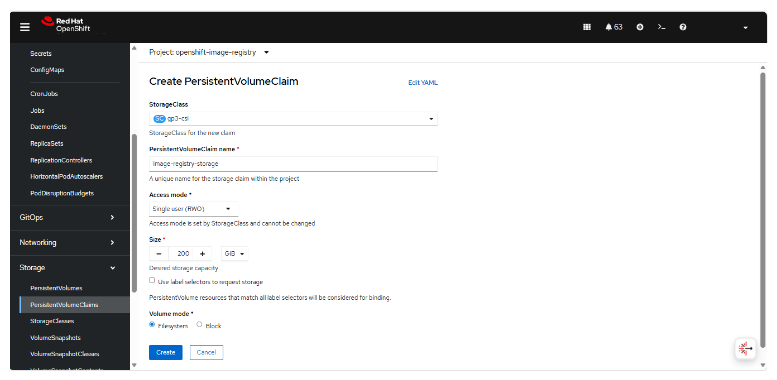
-
Edit Config Image Registry
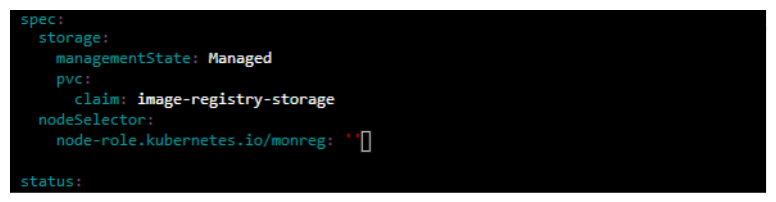
oc edit configs.imageregistry.operator.openshift.io clusterkind: Config apiVersion: imageregistry.operator.openshift.io/v1 metadata: name: cluster namespace: openshift-image-registry spec: ...output omitted... defaultRoute: true rolloutStrategy: Recreate storage: managementState: Managed pvc: claim: image-registry-storage nodeSelector: node-role.kubernetes.io/monreg: "" ...output omitted...
This concludes all configuration steps covered in Part 2 of the post-installation process for the OpenShift Container Platform (OCP) 4.18 cluster deployed on AWS using the IPI method. In the next section, I will discuss the detailed configuration of the logging stack using Loki.