
Deploy OCP on AWS with IPI Method (part 1)
Easily deploy Red Hat OpenShift Container Platform (OCP) on AWS using the Installer-Provisioned Infrastructure (IPI) method in 4.18 version.
Introduction
Who doesn’t know Red Hat OpenShift? It stands as one of the most powerful and trusted container orchestration platforms in the world built on the solid foundation of Kubernetes and engineered to simplify, secure, and accelerate modern application development and deployment. With enterprise-grade support, intelligent automation, and seamless integration across hybrid and multi-cloud environments, OpenShift empowers organizations to innovate with confidence and agility. Whether running on bare metal, VMware, or public cloud platforms as we are doing right now. OpenShift delivers a consistent, scalable, and reliable experience that bridges the gap between development and operations.
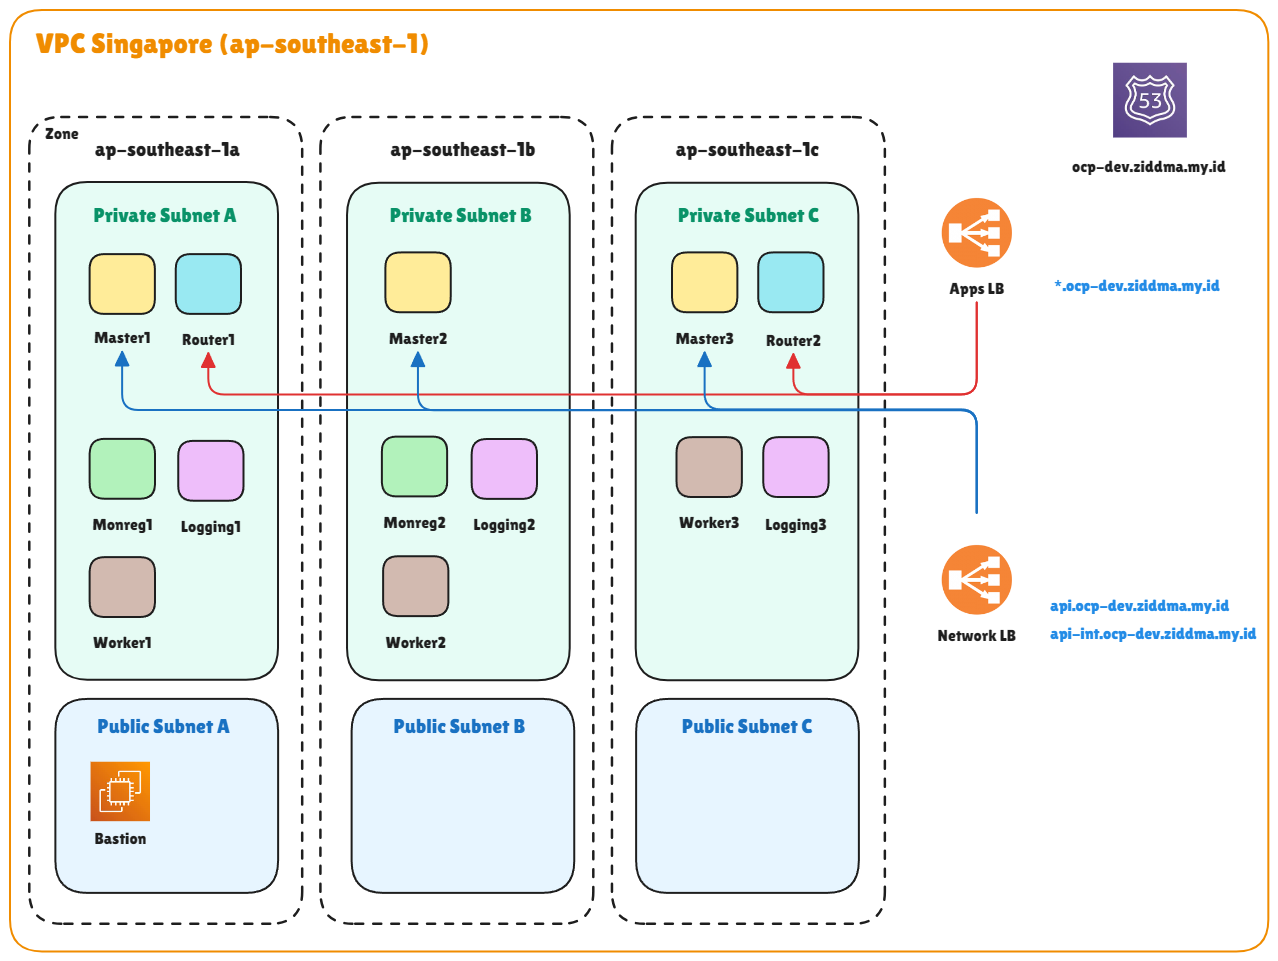
Topology
In this topology, we will implement common configurations frequently used in the industry by utilizing various types of infrastructure nodes such as router, monitoring, and logging nodes. This categorization is typically adopted to ensure workload distribution is efficiently handled by the designated nodes. In most Red Hat OpenShift Container Platform subscriptions, licensing is calculated based only on the number of active worker nodes, meaning that the number of infrastructure nodes (even if they use worker node templates) and master nodes are not counted. The cost is solely determined by the number of AWS provisioning instances used. In this setup, I deployed the cluster in the Singapore region with three availability zones. Additionally, you can register a custom domain purchased through domain provider like Domainesia or other local domain provider and configured it within the AWS Hosted Zone. In this project i will use 4.18 version for OCP method in AWS
Prerequisite
- Account Subscribtion RedHat
- Login to -> Console RedHat
- Copy Pull Secret
- Account AWS Administrator
- Access key ID
- Secret Access key
- Active Public Domain
- Hosted Zone AWS
- Register Propagate Nameserver
A. DNS Record
💡 Use the hosted zone in the AWS menu to set up DNS for the cluster. The hosted zone will be configured with a public IP address later.
-
Create Hosted Zone Route 53 → Hosted Zone → Create Hosted Zone

- Domain name : (Active Domain)
- Type : Public hosted Zone
- Save
- Copy All Nameserver
-
Choose Active Domain → Nameserver → Paste all nameserver from Hosted Zone
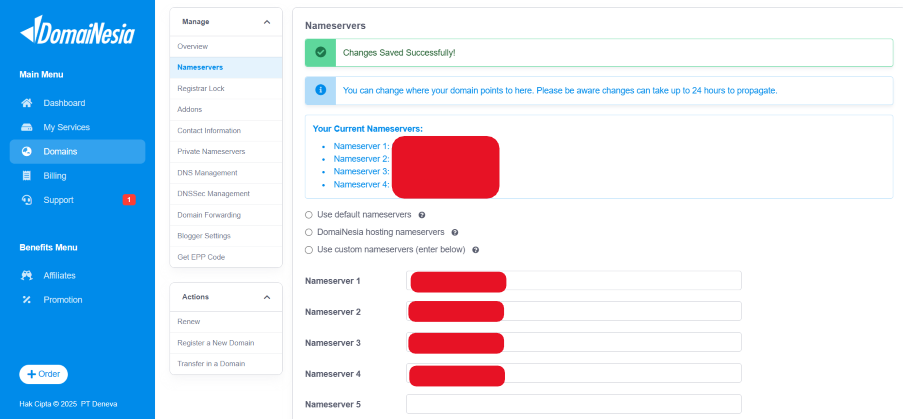
- Wait up to 24 hours for the DNS propagation to complete
- Check propagation : https://dnschecker.org/
B. VPC
💡 Using a custom VPC for cluster traffic isolation
-
Create VPC
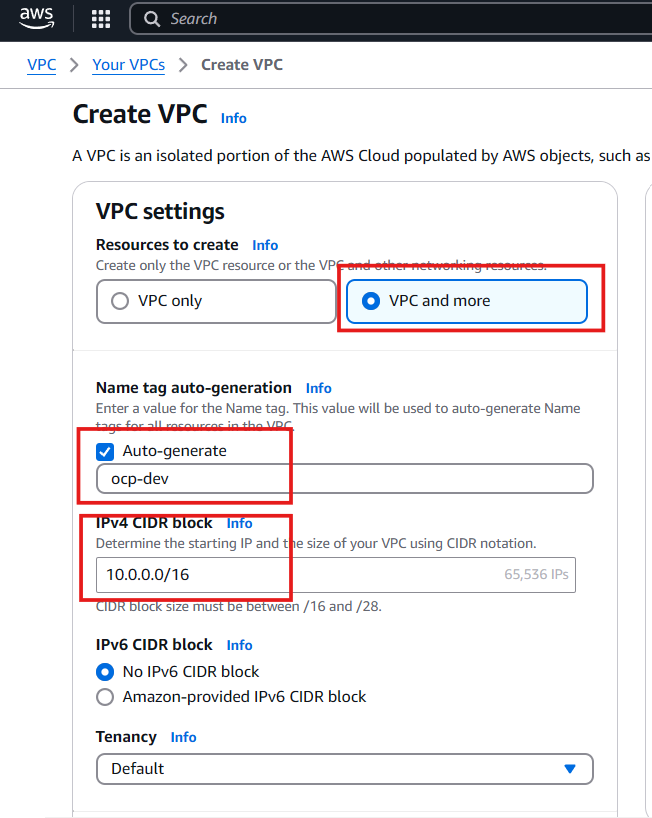
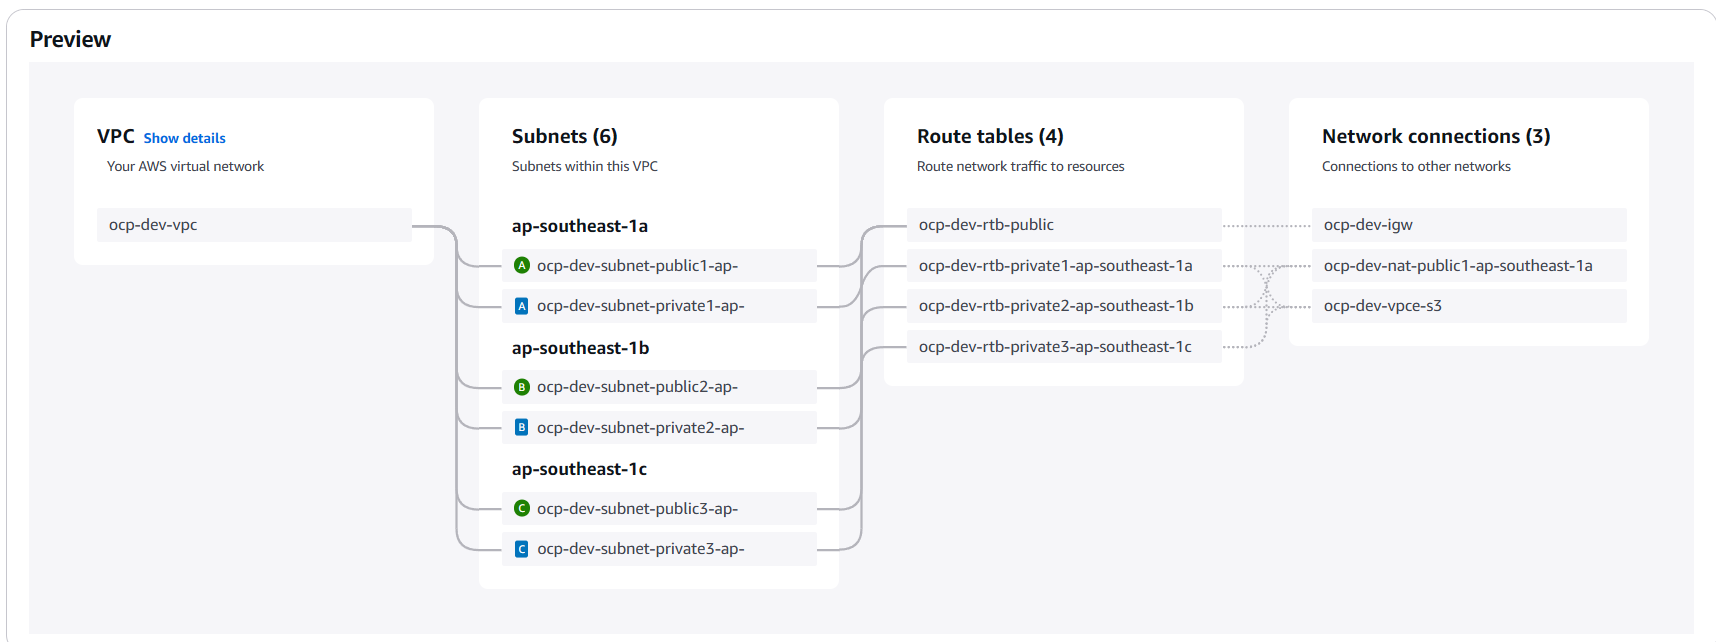
- Resource to create : VPC and More
- Name tag auto-generation : (VPC cluster name)
- IPv4 CIDR Block : 10.0.0.0/16
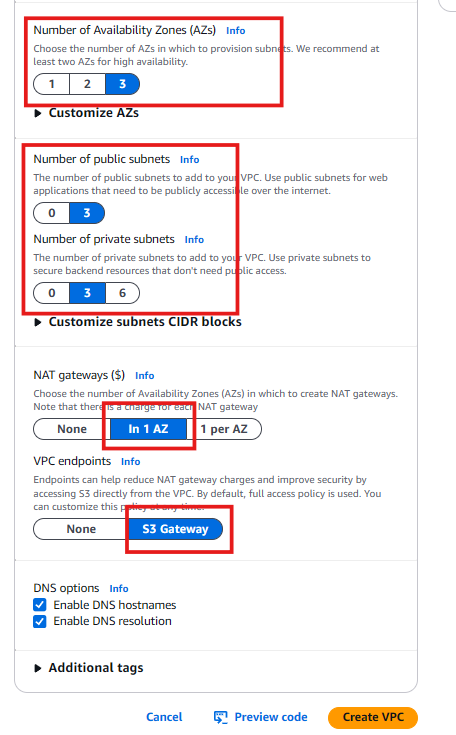
- Availability Zone : 3
- Subnet Public : 3
- Subnet Private : 3
- Nat gateways : in 1 AZ
- VPC Endpoint : S3 Gateway
- Create VPC
C. Security Group
💡 Security Group Needed for access traffic will be use in Bastion, In this configuration depends on your organization rule to access the bastion, but in my case i will allow everything for outbound and inbound. I need only SSH service to access with port 22
-
Create Security Group
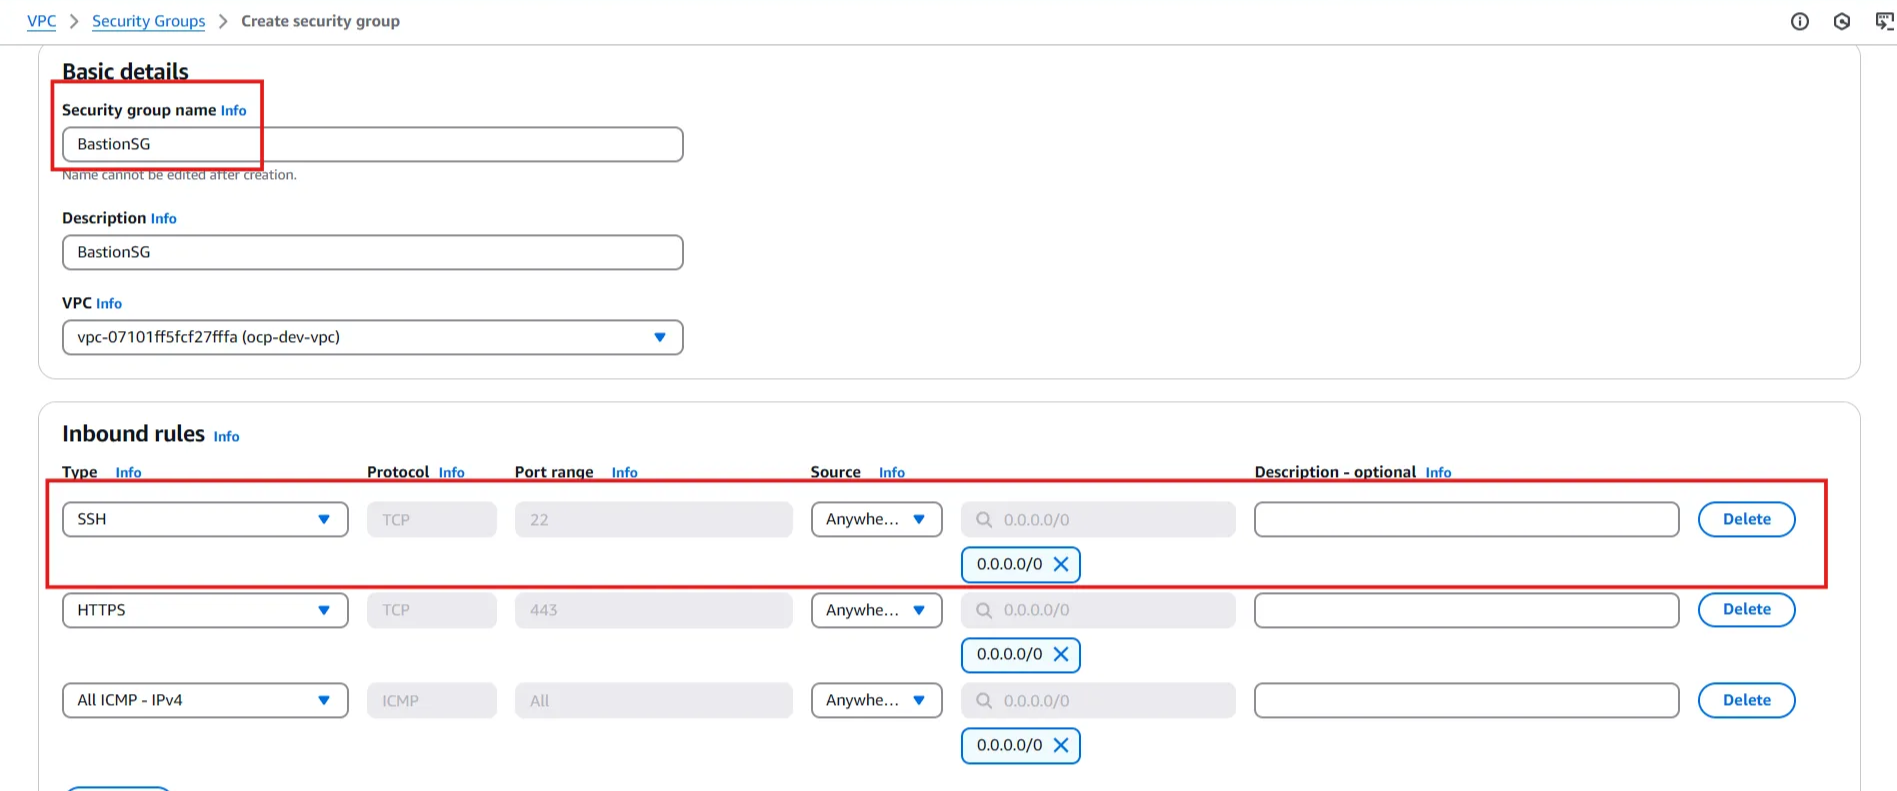
🚨 Do not copy my step to create Security Group for Bastion. You need to ensure your organization rule.
- Security Group Name : BastionSG
- Inbound : SSH - Source Anywhere
- Outbound : All Traffic - Source Anywhere
D. Bastion
💡 Bastion is used to access the cluster that will be created later. The bastion also plays a role in the OCP cluster bootstrap installation.
-
Create Bastion EC2 → Instance
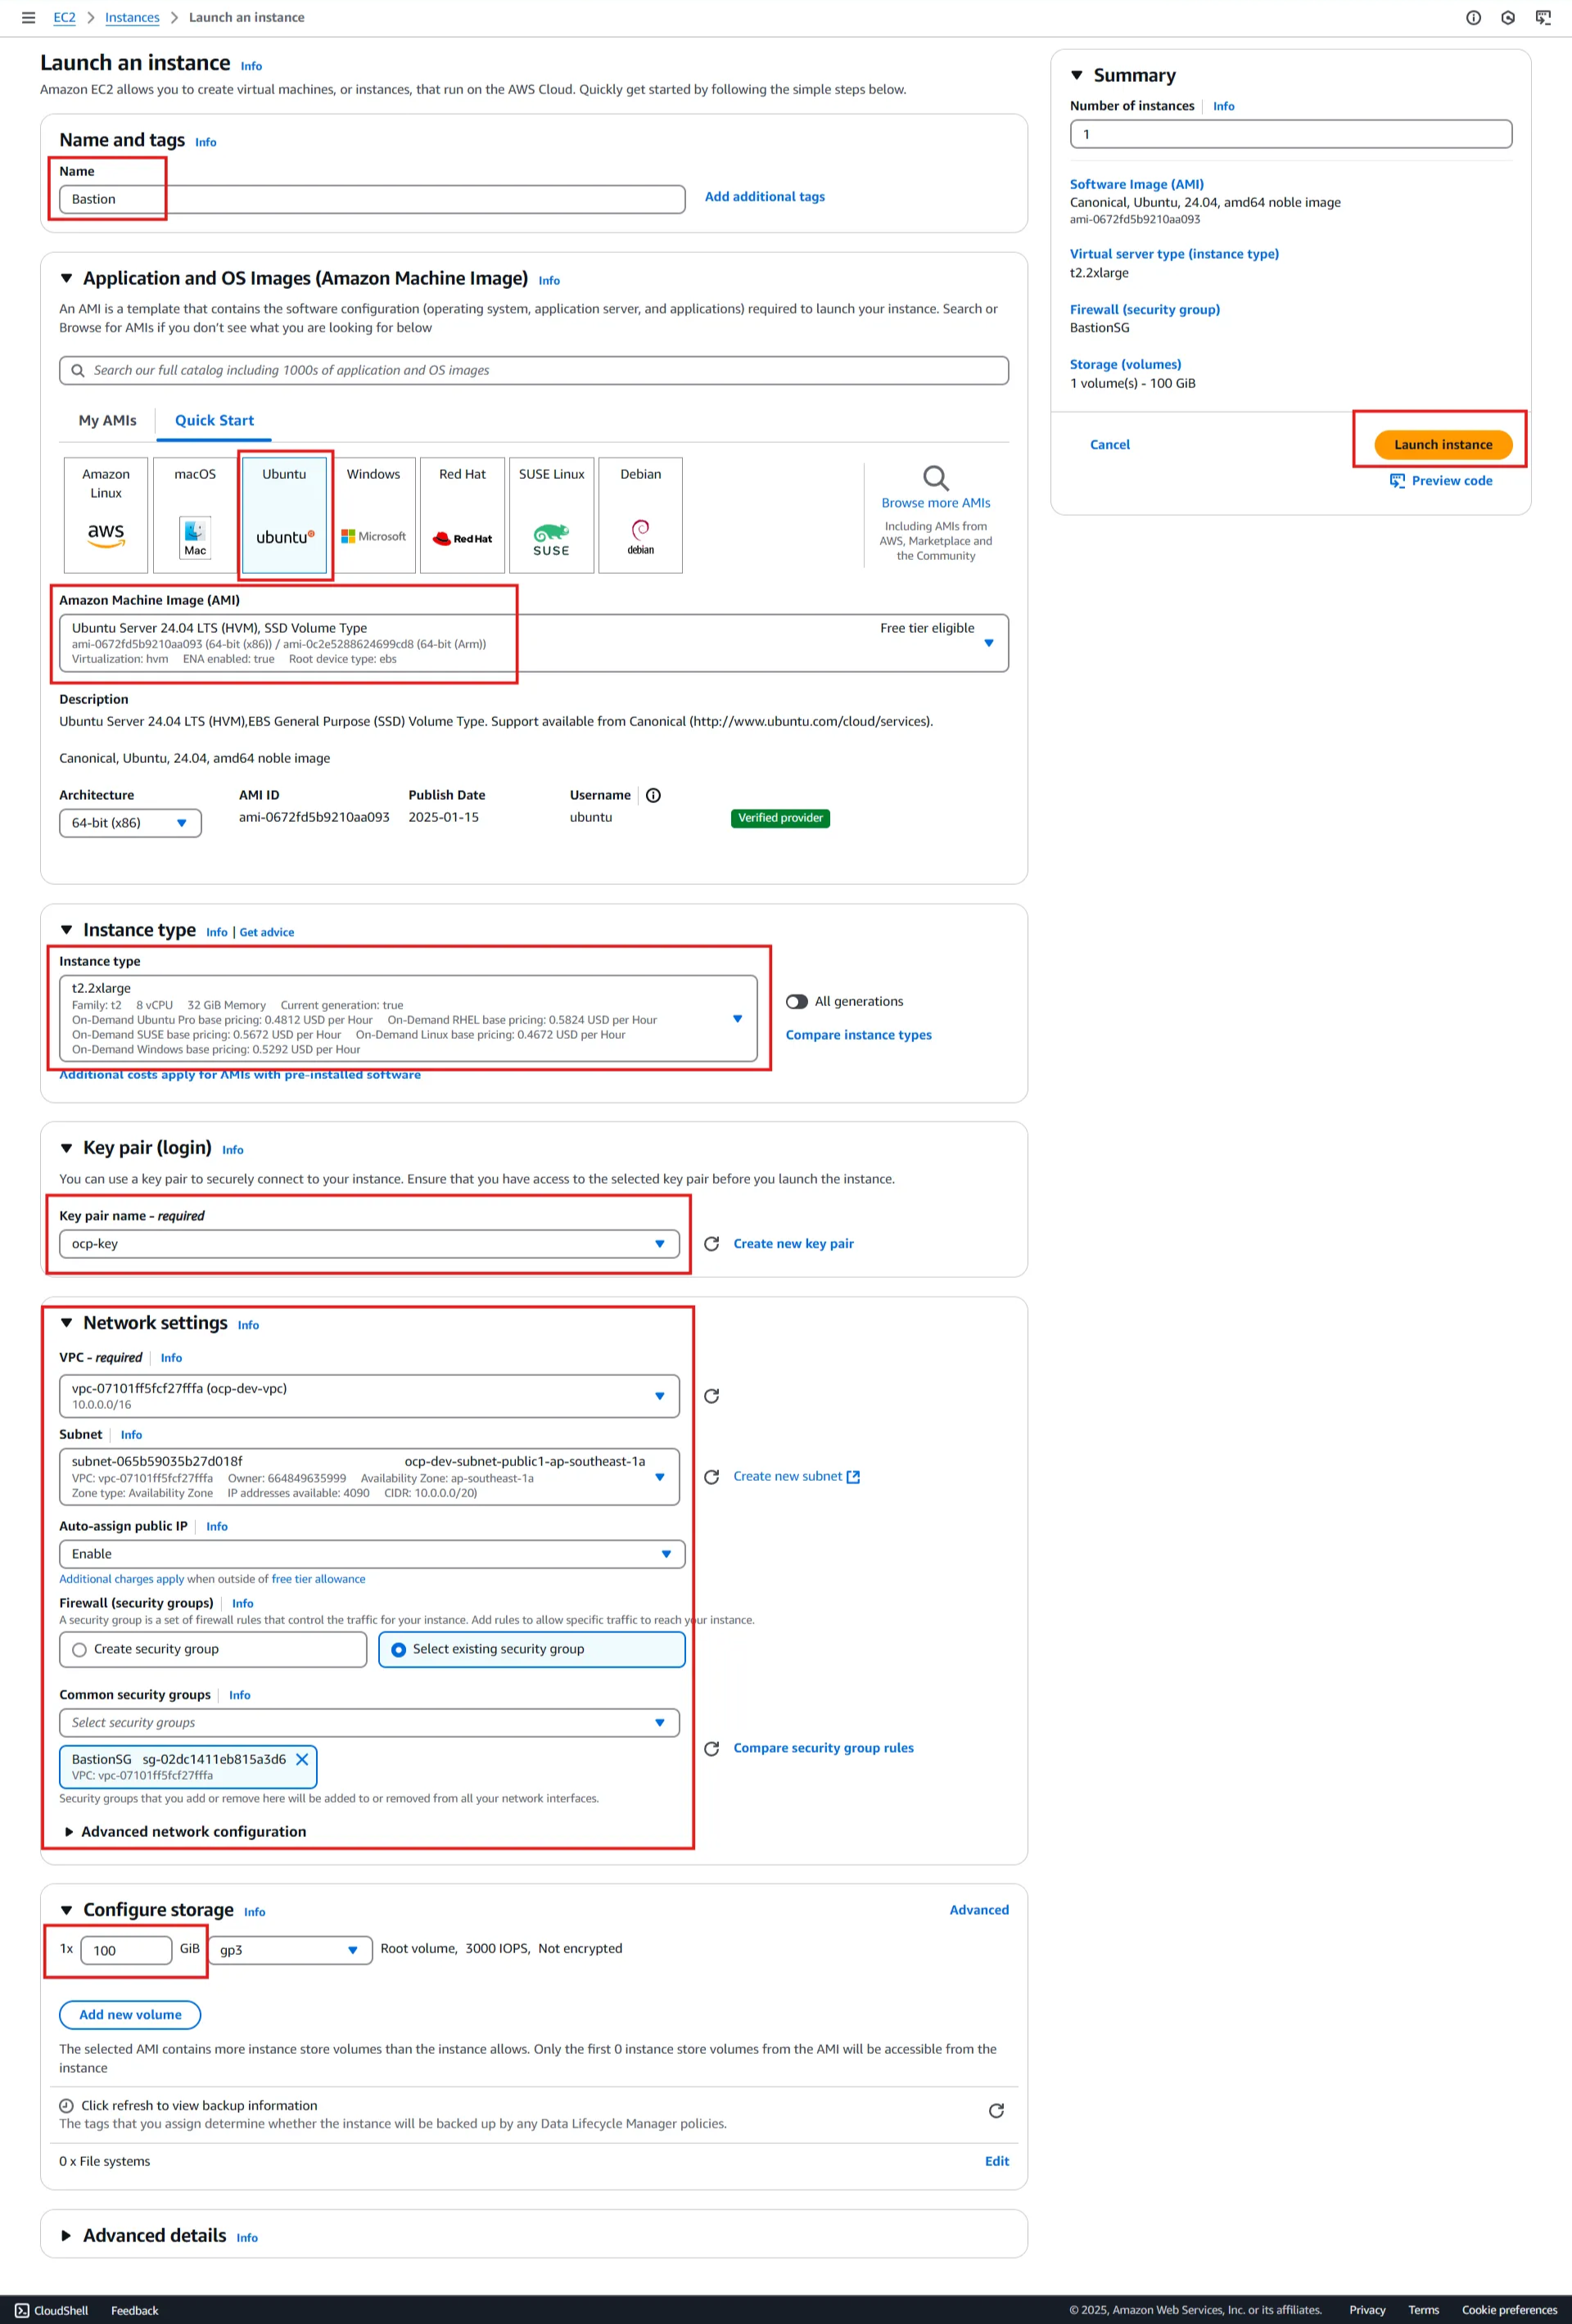
- Name : Bastion
- AMI : Ubuntu server 24.04
- Instance Type : t2.2xlarge
- Keypair : ocp-key
- VPC : ocp-dev-vpc
- Subnet : Public subnet - zone a
- Auto assign public IP : Enable
- Security Group : select existing SG - BastionSG
- Storage : 50GB
- Launch Instance
Cluster Installation
A. Tools
💡 Do this in Bastion Host with same AWS VPC
💡 Download the required tools for OCP cluster installation on the bastion host after SSH access using the key. You'll need to download both the OC client (oc command) and OCP Cluster Installer (ocp install) that match your desired version.

-
Setup OC Command
mkdir {ocp-dev,tools} cd tools wget https://mirror.openshift.com/pub/openshift-v4/clients/ocp/4.18.26/openshift-client-linux-4.18.26.tar.gz tar xvf openshift-client-linux-4.18.26.tar.gz sudo cp kubectl /usr/bin/ sudo cp oc /usr/bin/ -
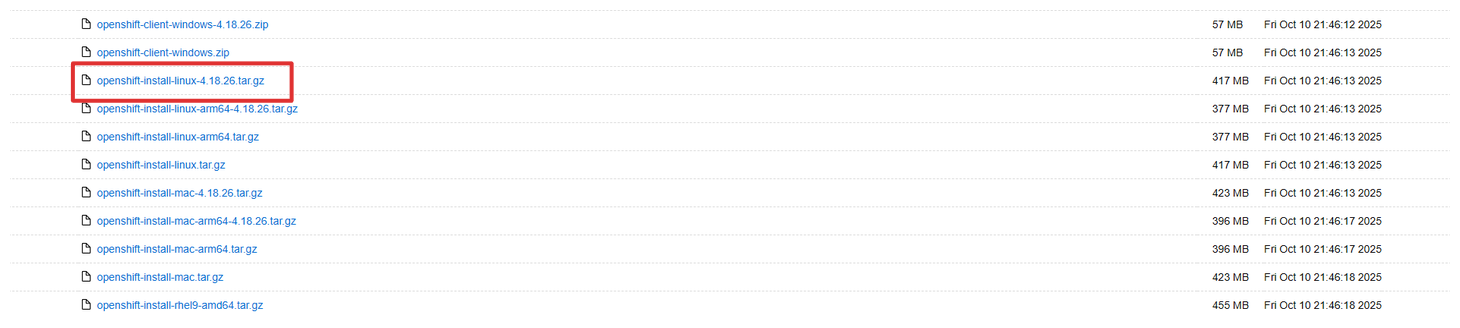
Download OCP Installer
wget https://mirror.openshift.com/pub/openshift-v4/clients/ocp/4.18.26/openshift-install-linux-4.18.26.tar.gz tar xvf openshift-install-linux-4.18.26.tar.gz cp ~/tools/openshift-install ~/ocp-dev/ -
Config OC Bash Completion
oc completion bash > oc_bash_completion sudo cp oc_bash_completion /etc/bash_completion.d/
B. SSH Key
💡 The SSH key will be used to establish communication between the installer Bastion Host and the Bootstrap node to create the cluster according to the configuration
-
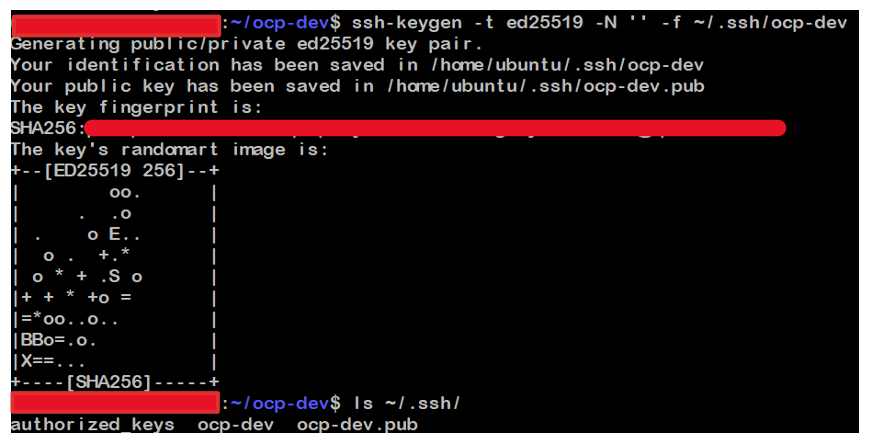
Generate SSH key
ssh-keygen -t ed25519 -N '' -f ~/.ssh/<key_name> ls ~/.ssh cat ~/.ssh/<key_name>.pub -
Add ssh-agent
eval "$(ssh-agent -s)" ssh-add ~/.ssh/<key_name>
C. Pull Secret
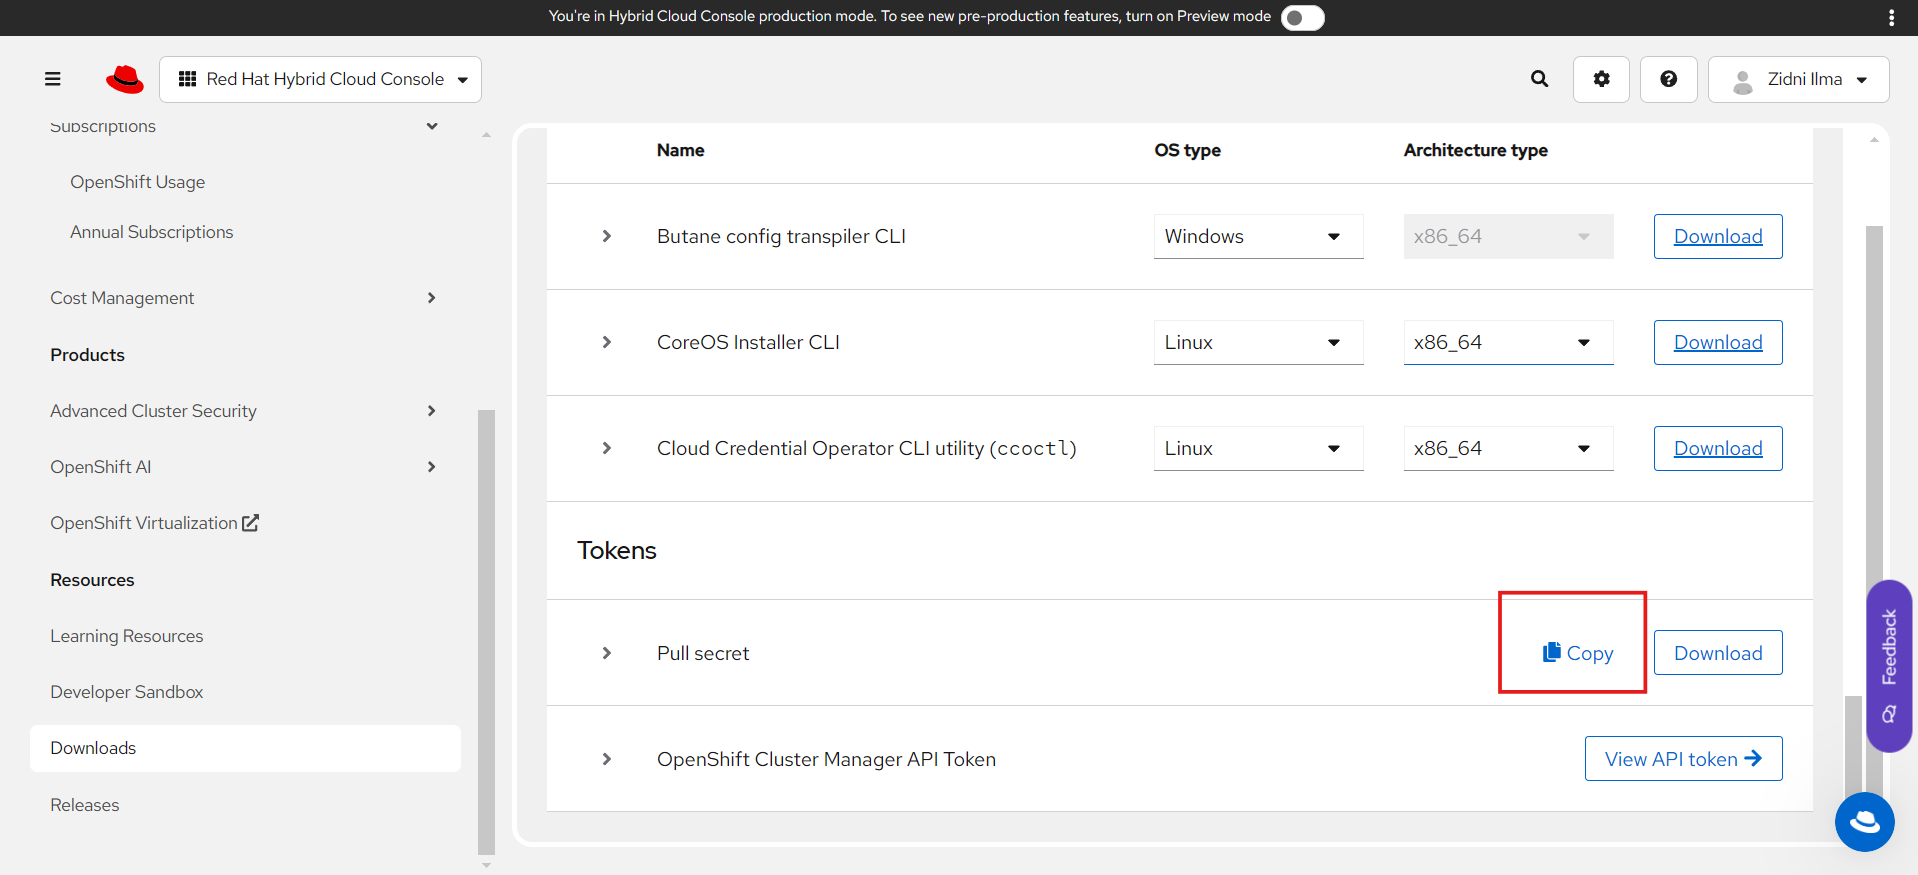
💡 A pull secret is used to identify users who want to use OCP. The pull secret is obtained from the Red Hat user who will create the cluster, and logging in is required to obtain it.
-
Login → Downloads → Tokens - Copy Pull Secret
D. Install Config
💡 Creating installation configuration for AWS OCP cluster through manifest generation
-
Create Installer Configuration

./openshift-install create install-config --dir ~/ocp-dev/- SSH Public Key : /home/ubuntu/.ssh/ocp-dev.pub
- Platform : AWS
- AWS Access Key ID : (Access key ID)
- AWS Secret Access Key : (Secret Access Key)
- Region : ap-southeast-1
- Base Domain : (Your Base Domain)
- Cluster Name : ocp-dev
- Pull Secret : (Paste Pull Secret)
-
Edit Install Config
💡 Edit install-config.yaml allow us to customize cluster’s specification. This include change detail such the instance type for Master and Worker node, the worker replica count and disk size for each node
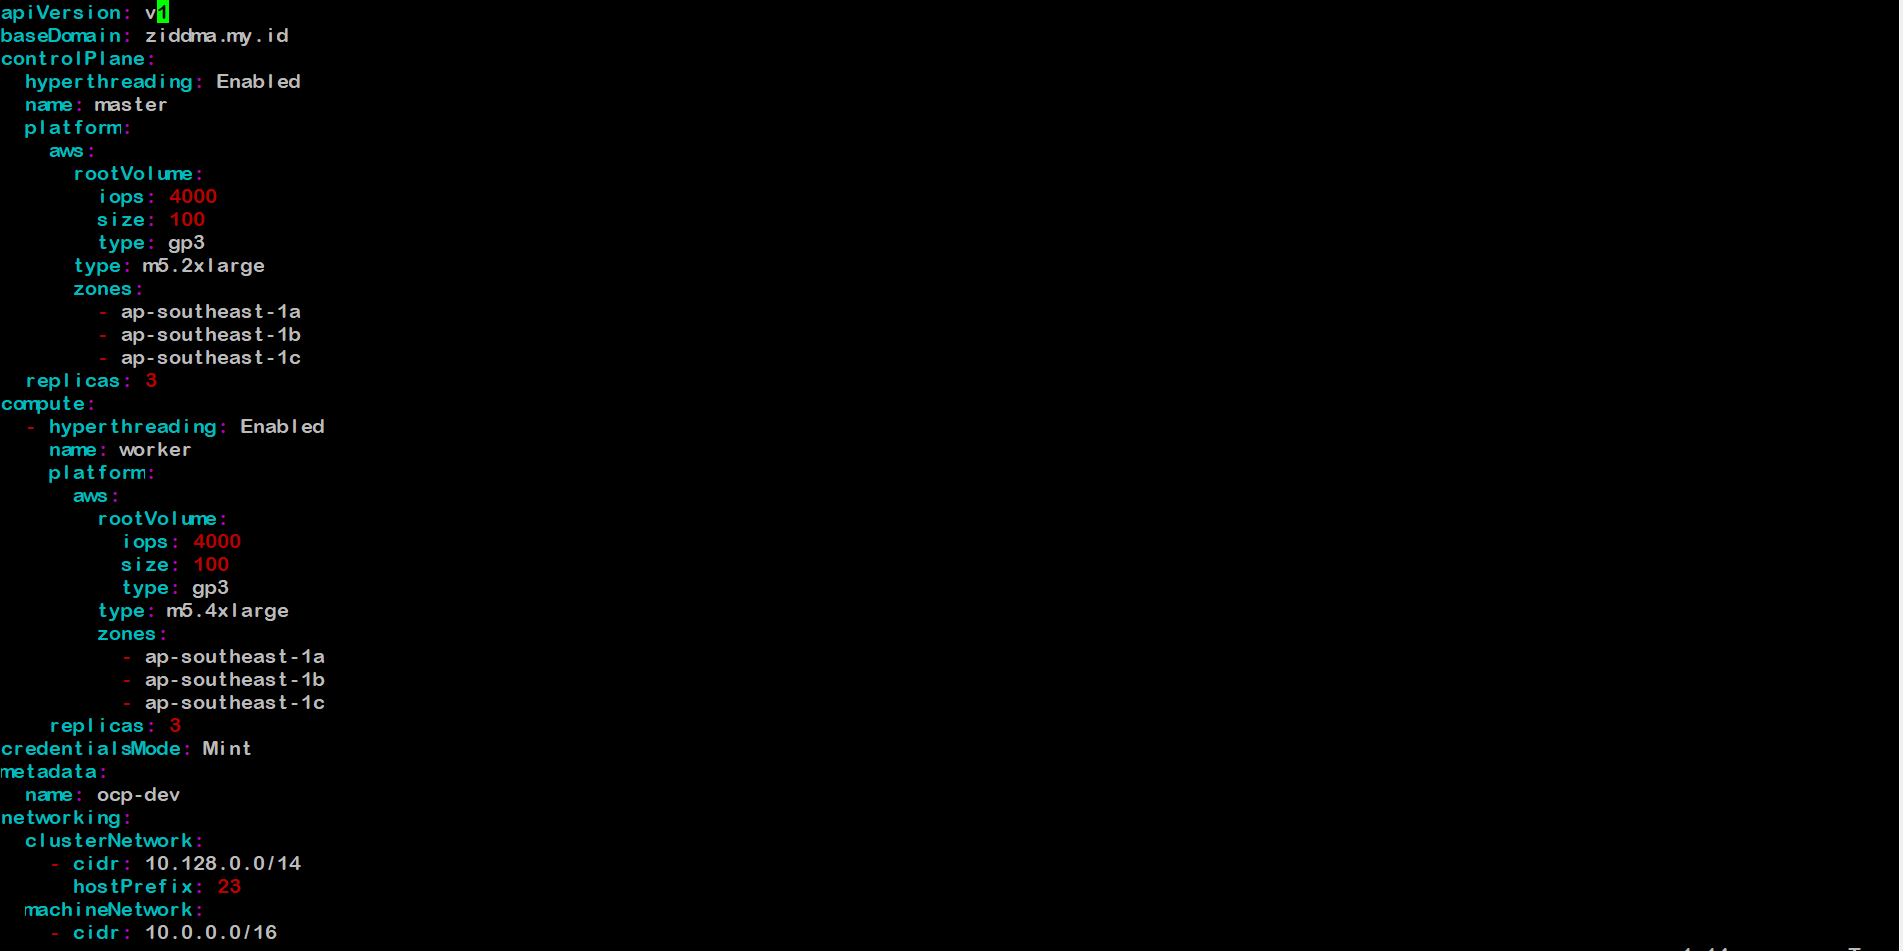

💡Installing OCP has standard minimum specification instance on AWS, 4/16 for Master Node and 2/8 for Worker node, and each type at least have 100gb storage for running system. In this lab we use M5.* family instance type and many tested type for installing OCP in below references
- Master
- Iops : 4000
- Size : 100
- Type m5.2xlarge
- Worker
- Iops : 4000
- Size : 100
- Type m5.4xlarge
- Subnet : (Paste all subnet ID from AWS onsole)
- Publish : External / Internal
- Master
-
Create manifest from install-config
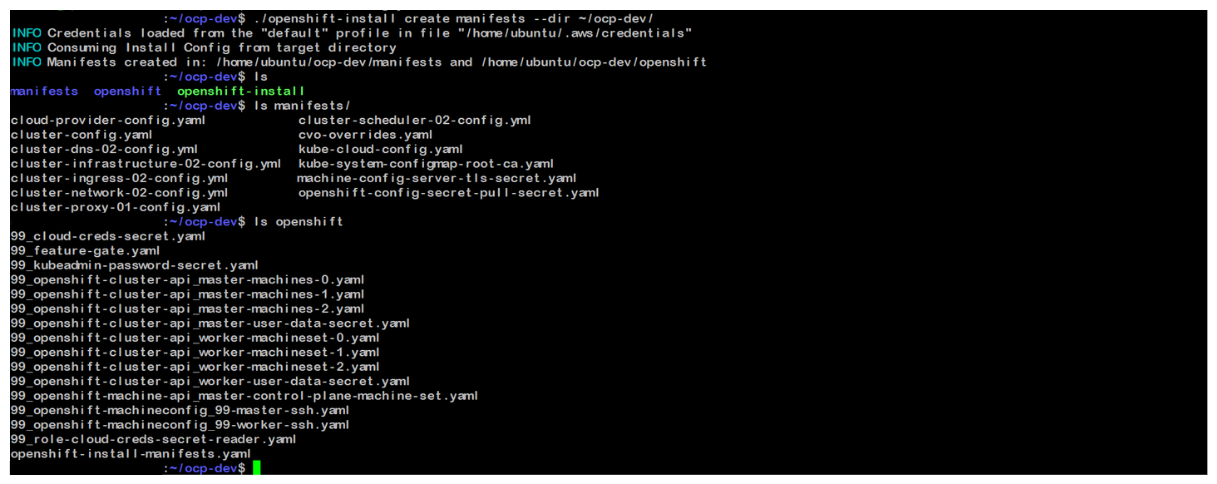
./openshift-install create manifests --dir ~/ocp-dev/
E. Create Cluster
💡 When create cluster it happens any time your connection can distraction, either we can use tmux or screen to prevent
tmux new -s <session_name> #If lost connection, resume with tmux list-session tmux a -t <session_name>
-
Create Cluster from manifest
In this installation, we will set the log level to debug so that every step performed by the installer can be observed in detail.
./openshift-install create cluster --dir ~/ocp-dev/ --log-level=debug -
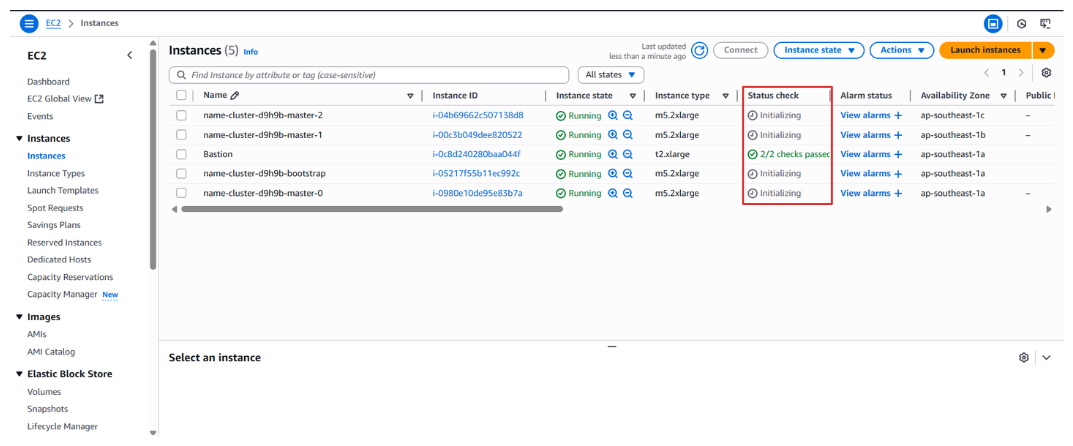
Installation Monitoring
You can monitor the cluster creation process performed by the installer configuration through the AWS Console. In the status check, you’ll see an “initializing” status when the instances are not yet fully up, and the process will gradually proceed through the bootstrap node. Once the entire cluster is up and running, the bootstrap instance will automatically shut down.
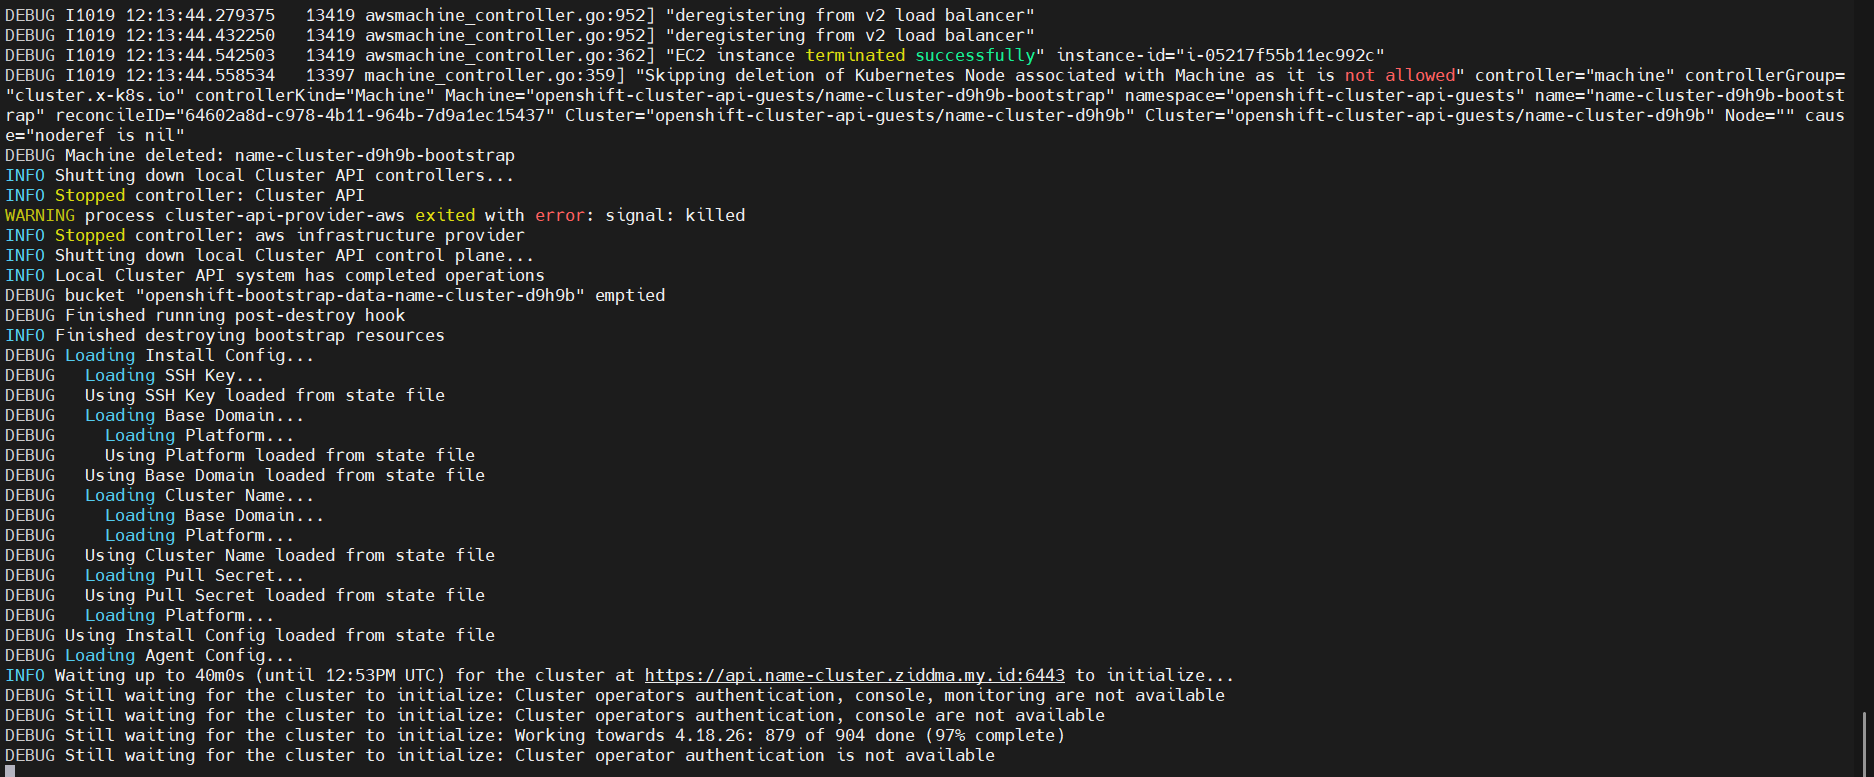
💡 Eventually cluster has successfully made, log installation can check at :
tail ~/ocp-dev/.openshift_install.log -
Verification Installation
💡 Verification cluster to convincing all cluster setup and bootstrap are clearly done
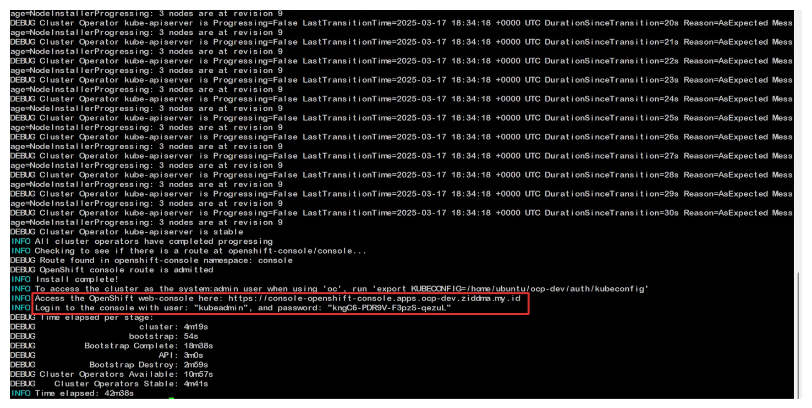
Link of web console & password will appear when all part cluster done made, password kube admin can be found at
~/ocp-dev/auth/kubeadmin-passwordTo make bastion can access with role system:admin, use command
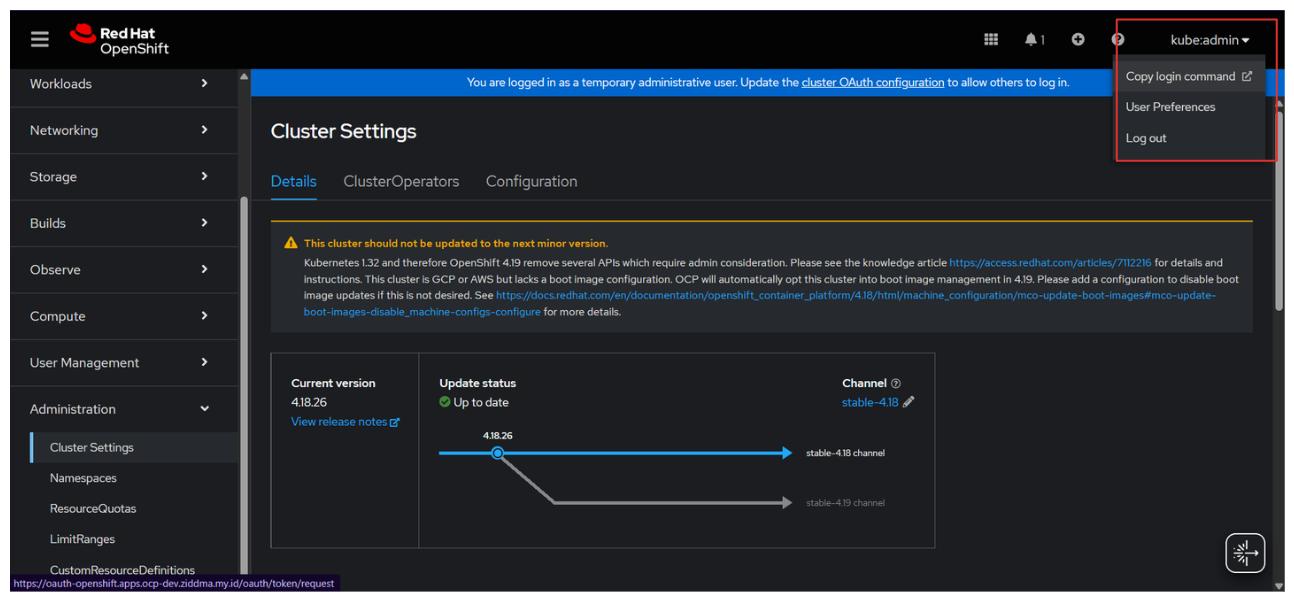
export KUBECONFIG=~/ocp-dev/auth/kubeconfigLogin OC CLI can be done through the web console, which require being logged in as an administrator first
Login → Copy login command → Display Token → Copy token → Paste in bastion
In the next chapter we will do Post Installation to configure OCP node infra needed. You can directy go to Part 2
Says “ yareuu ” if u done in this chapter
